Im sorry but your question seems a bit vague to me, could you clarify what you’re talking about?
nevermind it does not work
I have created a small demo with python that is the exact same code and the Santa was just fixed for python a link to a demo is
I watched your video and I am kinda new to using PID, but what do you mean when you were talking about oscillation ?
Thanks in advance for your help!
Also, Great video by the way.
No problem! Oscillation looks very similar to this:
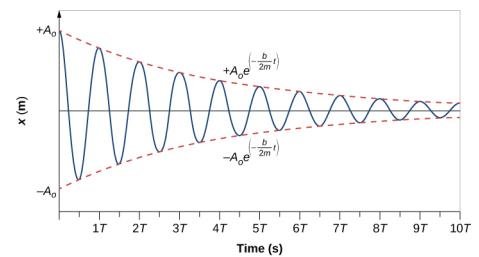
Ignore the equations, I just got this from Google images just for a reference. Imagine if this were a position over time graph, then this would be what the oscillation looks like. Generally the oscillation should be small (roughly within 5 degrees of desired value if used on a lift), then you will dampen it by increasing kD.
So, just to make sure I understand, your saying that as time moves on the robot’s position will come to stop when you reach the desired position and the difference between where you are and that desire position is oscillation?
I think you’re overthinking what oscillation is. Oscillation is a swinging/rocking effect near a desired value. So if I ran a PID with just kP tuned (and the rest at 0), it should go towards the position and then swing back and forth towards the desired value.
After doing a bit of searching, this is what P should look like: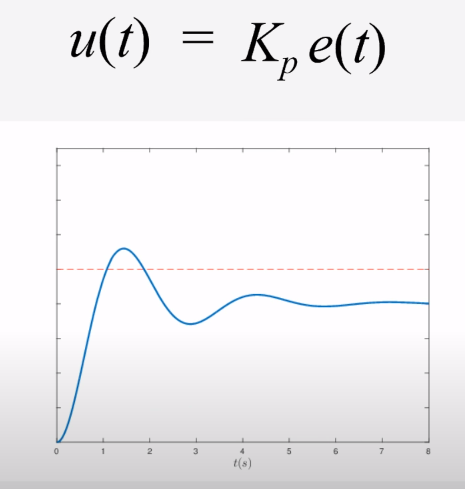
So when people say, “you can just use a P loop for that.” Would that just be to reduce oscillations? And why would you just want that instead of the whole PID?
If you have an arm/lift, you’re generally going to be utilizing P and PID in different scenarios. You will be using a P control loop whenever you wish to put the arm/lift safely against a hard stop. For a P control loop against a hard stop, you would generally make the P be relatively low, then set the desired value to be past the hard stop. You can do PD control loops as well, but its not necessary against hard stops. We don’t want integral to be involved against hard stops because the integral will continuously increase its value until the motor goes a full 12 Volts into the hard stop either breaking the hard stop, burning out the motor, or breaking the motor. A P control loop is useful for having an arm in the down position and not having it swing back and forth while moving around. Then, when you raise up the arm to score it, you would then use PID to precisely move to a point. From my past years of VEX, I have always done the default position to be a P control loop against a hard stop, and having position control to any location be a PID control loop. I’ve done this method on every robot I have built, now that I think about it.
Anyways, there’s one common problem with PID, and that is with arms that carry a variety of weights so the integral freaks out and the potential doesn’t get strong enough. I believe I have found a simple solution for this, and I may make a tutorial if it works well.
Oh, I understand now (I was overthinking it). Thank you so much!
I was in the same boat as you a few weeks ago, but basically a PID loop has 3 parts to it: Proportional (P) which gets the robot close enough to the target, Integral (I) which gets the robot the rest of the way, and Derivative (D) which predicts using the past positions where it will be in the future to help it not overshoot(go past the target distances). PID code can be hard to understand but look at this forum post (if you are still confused) and it helped me to understand it. PIDs for Autonomous
Yeah I have been doing PID for almost a year now and I feel pretty confident in it. Thanks though.
Hello, I am new to this PID code but I managed to get most of it down and my robot moving. I have one question though, how can I make a full autonomous using PID code. For some reason, if I try and put more actions for the robot, the previous actions get skipped and the robot immediately follows the last action in the code.
Probably just add some wait times between commands. You need to give time for each command to complete.
Do you set the last argument to rotateTo() function waitForCompletion to true or false?
https://api.vexcode.cloud/v5/html/classvex_1_1motor.html#a156357a80abc4a5aa2c73b867527927f
Oh, I didn’t do any of that, will definitely try it out. Thank you!
Hey @anon4126930, I had a question. How can I make a separate task that calculates PID and then change the velocity of the motors while they are running in main task? I am able to calculate the PID values and corresponding new velocity in a PID task but attempts to change the motor velocity done by that task do not seem to impact the velocity of motors once they already started running in the main task.
@anon4126930 Would a inertial sensor help this? Or what sensor would? And how would that be added? Sorry for so many questions.
In rotational motion, you just set the error = desired_rotation - inertial rotation
error = desired_angle - Inertial.rotation(deg);Where desired_angle is a variable that you set to tell the robot the angle you want it to go:
i.e.
desired_angle = 100; //DegreesYou have inertial.heading() which is 0-359, but wraps back to 0
There is the preferred inertial.rotation() which has no wrapping but instead goes on indefinitely either way (-∞, ∞). rotation() is most preferred for programming leniency.
https://api.vexcode.cloud/v5/abstract/class/classvex_1_1inertial
is there possible for not v5 pro but normal v5 text?
I cant figure out how to add the task bit.