You mean tank drive?
1 Like
Yes, I mean as a tank drive. If you configure it with the graphical configurer, it adds a ton of really confusing code, is there an easy way to do it?
1 Like
Idk what it looks like with blocks, but in text it looks like this
Lw1.spin(controller1.axis3.value);
1 Like
Question #1:
Can you share a link to these tutorials?
Question #2:
Is the drivetrain function (which looks awesome) limited to a tank drive or can it also be used for x-drives or mechanum wheels?
3 Likes
How does one go about enabling this “Expert Robot Configuration,” I’ve been looking and haven’t been able to find out how.
1 Like
see this.
5 Likes
Thanks, that did the trick.
1 Like
where do you put the autonomous in the competition main?
1 Like
Make sure you’re using the ‘Competition Template’ from the Examples.
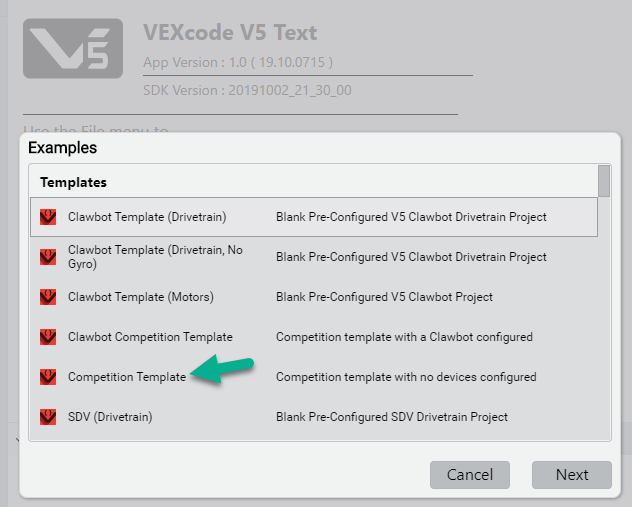
Then you put it into the autonomous() function in the template:
/*---------------------------------------------------------------------------*/
/*                              Autonomous Task                              */
/*  This task is used to control your robot during the autonomous phase of   */
/*  a VEX Competition.                                                       */
/*  You must modify the code to add your own robot specific commands here.   */
/*---------------------------------------------------------------------------*/
void autonomous(void) {
  // ..........................................................................
  // Insert autonomous user code here.
  // ..........................................................................
}
3 Likes
-
They’re in the app under File → Open Tutorials
-
As of now it’s focused on traditional 2-motor / 4 wheel drivetrain systems (think clawbot). We’re looking at ways to expand this feature moving forward
4 Likes
Found a missing enum:
motor.spin(fwd, 100, pct); works
motor.spin(reverse, 100, pct); works
motor.spin(rev, 100, pct); does not work.
Is this because “rev” could be short for reverse AND for revolutions?
Paul
1 Like
yes, “rev” was shorthand for “rotationUnits::rev”
the preferred new enums are “forward” and “reverse”. We kept “fwd” for backwards compatibly so code written over the last 12 months will still work.
2 Likes
The numbers after the drivetrain what do each of those mean.
1 Like
https://api.vexcode.cloud/v5/html/classvex_1_1drivetrain.html
Take a look at the constructor - it’s for wheel circumference, track width, and wheelbase.
4 Likes
ok i will try that
20 characters
2 Likes
Our groups are unsure what should be going into robot-config.cpp vs. main.cpp ? More specifically, it looks like the auto-generated code puts all user control features into a ‘while’ loop in robot-config, then what exactly should be placed in usercontrol() in main.cpp ? COuld someone spell out the difference, or how the two files interact with one another?
1 Like
When using the ‘Competition Template’ that you find under File > Open Examples, I don’t see any user control features in robot-config.cpp. The robot-config.cpp file only has declarations for devices and the vexcodeInit(void) function.
Was this from a converted file or did you create it from one of the Templates?
Here’s the robot-config.cpp file from the Competition Template, no modifications:
robot-config.cpp (No modification)
#include "vex.h"

using namespace vex;
using signature = vision::signature;
using code = vision::code;

// A global instance of brain used for printing to the V5 Brain screen
brain  Brain;

// VEXcode device constructors

// VEXcode generated functions

/**
 * Used to initialize code/tasks/devices added using tools in VEXcode Text.
 *
 * This should be called at the start of your int main function.
 */
void vexcodeInit( void ) {
  // nothing to initialize
}
Here’s the main.cpp file from the Competition Template with no modifications:
main.cpp (No mdofication)
/*----------------------------------------------------------------------------*/
/* */
/* Module: main.cpp */
/* Author: VEX */
/* Created: Thu Sep 26 2019 */
/* Description: Competition Template */
/* */
/*----------------------------------------------------------------------------*/
// ---- START VEXCODE CONFIGURED DEVICES ----
// Robot Configuration:
// [Name] [Type] [Port(s)]
// ---- END VEXCODE CONFIGURED DEVICES ----
#include "vex.h"
using namespace vex;
// A global instance of competition
competition Competition;
// define your global instances of motors and other devices here
/*---------------------------------------------------------------------------*/
/* Pre-Autonomous Functions */
/* */
/* You may want to perform some actions before the competition starts. */
/* Do them in the following function. You must return from this function */
/* or the autonomous and usercontrol tasks will not be started. This */
/* function is only called once after the V5 has been powered on and */
/* not every time that the robot is disabled. */
/*---------------------------------------------------------------------------*/
void pre_auton(void) {
// Initializing Robot Configuration. DO NOT REMOVE!
vexcodeInit();
// All activities that occur before the competition starts
// Example: clearing encoders, setting servo positions, ...
}
/*---------------------------------------------------------------------------*/
/* */
/* Autonomous Task */
/* */
/* This task is used to control your robot during the autonomous phase of */
/* a VEX Competition. */
/* */
/* You must modify the code to add your own robot specific commands here. */
/*---------------------------------------------------------------------------*/
void autonomous(void) {
// ..........................................................................
// Insert autonomous user code here.
// ..........................................................................
}
/*---------------------------------------------------------------------------*/
/* */
/* User Control Task */
/* */
/* This task is used to control your robot during the user control phase of */
/* a VEX Competition. */
/* */
/* You must modify the code to add your own robot specific commands here. */
/*---------------------------------------------------------------------------*/
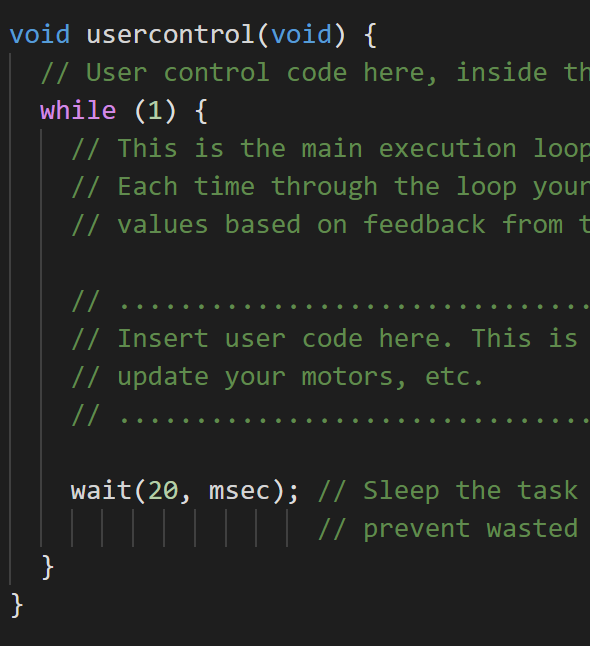
void usercontrol(void) {
// User control code here, inside the loop
while (1) {
// This is the main execution loop for the user control program.
// Each time through the loop your program should update motor + servo
// values based on feedback from the joysticks.
// ........................................................................
// Insert user code here. This is where you use the joystick values to
// update your motors, etc.
// ........................................................................
wait(20, msec); // Sleep the task for a short amount of time to
// prevent wasted resources.
}
}
//
// Main will set up the competition functions and callbacks.
//
int main() {
// Set up callbacks for autonomous and driver control periods.
Competition.autonomous(autonomous);
Competition.drivercontrol(usercontrol);
// Run the pre-autonomous function.
pre_auton();
// Prevent main from exiting with an infinite loop.
while (true) {
wait(100, msec);
}
}
It does add some additional device setup when you add a DriveTrain and a Controller, is that what you’re referring to?
3 Likes
Here is what I mean: I just did the following.
1.) Created new file from competition template example.
2.) Added a motor, controller, and connected the controller buttons to the motor (all through the new GUI…none of it hard-coded)
I look at my files now and I see:
In robot-config.cpp:
In main.cpp:
We would have normally placed the conditional statements, to control buttons, in main.cpp, but now it appears that those driver control statements are being auto-completed in the robot-config.cpp file.
So my questions are, a.) Why?, b.) What would I then put in user control, and c.) what file would I place additional user-created functions to use in auton or driver controlled periods?
Does that make sense?
1 Like
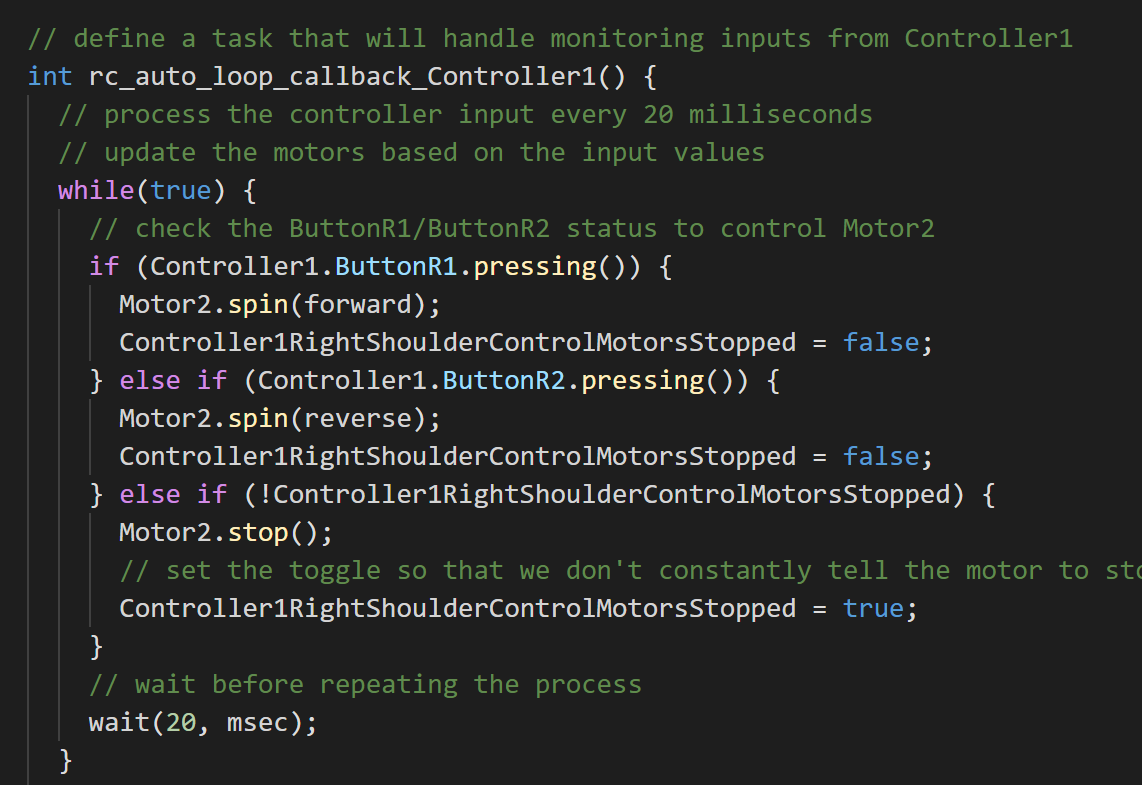
When you add a DriveTrain and Controller device to the Robot Configuration Wizard, VEXcode automatically generates the code for how the Controller will command the DriveTrain motors. That code is automatically added to robot-config.cpp to make it easy for students to get started.
You’ll still need to write your own code for other motors, like Lift or Claw motors, to the usercontrol() function in main.cpp. They just made it an easy entry point for teams to get the Drive Control going through the Robot Configuration wizard.
They can take control of everything by enabling ‘Expert Robot Configuration’. @tfriez explains how to do that in this post: VEXcode V5 Text 1.0.1 - You Spoke, We Listened
2 Likes
How to set the drive train more than two motor? I am using 4 motors.