Here is 24C’s ROBOTC program for the 2010-2011 VEX Robotics Competition season, VEX Round Up.
Feel free to comment, ask questions, demand that I explain it more, or whatever. Hopefully the comments are good enough at explaining what it does. (I know they are sloppy in some parts… :o Sorry about that…)
So here it is (the latest version I have on this computer, that is): [ATTACH]4051[/ATTACH]
(Yes this is a very short post. I’m tired, but didn’t want to forget to post this like I have been.)
~Jordan 24C_2011_4_2_Full_Competition_Code.c (84.6 KB)
That’s some neatly written code! I was quite impressed at the comments. Whenever I write something that complicated, it’s usually a jumble with few if any comments (this probably has something to do with programming a week before competition :D). Nice job!
Very! Go ahead, I’m very open to criticism, and want to know what I could do better. Some of it I may already be implementing for next year, but go ahead as I may not have thought/may not know of certain/a lot of (most likely the latter) things.
Great features already included, good examples for other teams:
block comments at the top of each routine
Good (long) variable names, generally
Symbolicly defined names for motornames, arm positions, etc,
RobotC: Note <f9> key shows the byte-compiled assembly for each line of C, if you want to count bytes, or otherwise see what is going on. Much of my comments are based on looking at this low level detail.
Possible alternatives, more than one way to do it:
Use f9 to look at the difference between constants and set-once-variables.
Eg DistToMaxSpd1
Equations with Constants are simplified at compile time, even by RobotC.
Equations with set-once-variables are not simplifed.
Constant reference and variable references take about the same code size
Set-once-variables have initialization overhead.
Constants do not have initialization overhead.
Drive() routine contains many Set-once-variables that would be better as Constants.
Naming conventions: Constants usually have some naming convention,
either all uppercase eg: FORWARD
or prefix or suffix convention eg: cForward, or Forward_c
It really helps to know what is a constant and what can change.
Drive() first nested if/then/else is a look up table
alt1: reformat as lookup table with columns to show table format.
if ( Dir == Forward ) { DL = 1; DR = 1; }
else if( Dir == Backward) { DL = -1; DR = -1; } …
alt2: predefine global array and prepopulate
// change direction range from 1…8 to 0…7 so that C-array base 0 fits
// Predefine a lookup table for DirModLeftAr Direction ]
const int DirModLeftAr] = { 1, -1, -1, 1, 0, 1, 0, -1};
const int DirModRightAr] = { 1, -1, 1, -1, 1, 0, -1, 0};
// then entire C code lookup table is just 2 lines:
DirModLeft = DirModLeftAr Direction ]; // example use
DirModRight = DirModRightAr Direction ];
why?: avoids branches (if/then/else) and cleaner syntax
Use integer defined enum type compare in stead of “String compare”
orig: if (SensorDrive == “SensorEncoderDrive”)
alt: use integer constants for terms like SensorEncoderDrive/Line/Time/Crossing
like you used for Direction to make faster comparisons
Twisty nest of if/then/elseif/else/if branches, many cases hard to follow.
Simplest example is StopDrive if any of a bunch of conditions;
StopDrive is the while loop control
orig: if (cond1) { StopDrive = true; }
else if (cond2) {StopDrive = true;}
…
alt: just use break instead of StopDrive; Much cleaner.
if ( cond1 ) { break; } // any break will exit the while loop
if ( cond2 ) { break; }
if ( cond3 ) { break; } // I learned this from “Perl Best Practices” book.
task autonomous() picking different automodes by comparing with specific pot values
alt: see team1103 code, just divide pot value by 800? to get a simple number from 0…5, then use a case statement or lookup table to select routines. Use an LED as feedback if you can.
It would probably be good to partition the autonomous routines each into their own subroutine, and call them from a case statement, rather than put the entire program inline with if/then/else tree.
–DriveMotorControl has some interesting features
deadband (Neutral) = +/- 15 , InitialPower = 15
/1.75 if any button 5,6 is pushed (precision mode?)
Floating point values, (N/127)^5 fifth power exponential scaling
Tank drive (not arcade), usually requires second joystick for arm.
Q: have you printed a table of -127…127 input values to output values?
Note that over half the joystick range (-65…65) has |strength| < |20|
alt0: try 3rd power of TempScale instead of 5th power and see how it drives.
alt1: Since left and right joysticks have the same conversion function,
you could put the common code in one routine, and call it independently for each stick.
alt2: 2 of 3 assignments to LeftDriveMotors are the same in each branch of If. Code would be shorter and clearer if this were factored out of the if blocks. Put the common code above the IF.
alt1&alt2 makes the code easier to maintain by having less duplicate copies to update when you make a change.
Thank you! I did not know that, this should be useful.
Yep. My father was telling me over and over again to use Constants instead of variables anywhere possible, and I listened to him, but didn’t go back to many of the variables to change them to Constants, and just sort of left them as variables. Something I learned halfway through writing the code (how to program in constants, and that you should use them rather than Set-once-variables) and so was inconsistent throughout the program.
Another thing my dad was talking to me about. Certainly would be a help to be able to easily tell the variable type.
A good idea to keep everything together and easier to look at and understand.
Haven’t worked at all with arrays, probably a good thing for me to look into.
Yep, another thing I started changing halfway through programming, and never went back to change all that had been done earlier with the “String comparing”.
Break was something I saw once, but I never ended up using it/trying it at all.
Now that’s a good idea; never even thought of that. As for an LED, for Clean Sweep our robot had a potentiometer embedded in metal that had LED’s placed around it, that would light up when the potentiometer was in the correct spot, and so you would turn it until the correct LED lit up. However at that time we only had 5 (in all, including Skills Challenge) routines, so it didn’t prove as useful, anyway. I hope to maybe buy an LCD Screen and use that for feedback.
This is something I thought of doing after I realized how messy all my autonomous routines were all mashed in together in the Autonomous task. Unfortunately it wasn’t until late that I finished writing all of them and so I didn’t have enough time to properly do that. Probably something I’ll do this year.
Quite some time ago I made a single joystick version of the program so that I could test drive it by myself when debugging the User Control code. Here’s an old version of that: [ATTACH]4111[/ATTACH]
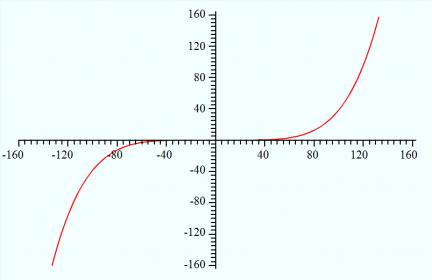
No, I do not. I had originally just tried a few numbers to see the results I would get, and also entered the equation into a graphing calculator. Here’s what the graph looks like: [ATTACH]4114[/ATTACH]
Did that. Tried from 2nd power all the way up to 6th or 7th, I believe. This one seemed to have the best results, from my testing, though I probably should have retested the different powers later, after some changes were made to our robot.
True, these are good points. I need to work on conserving space in my code.
Don’t believe that I do. Thank you very much for taking your time to go over that!
2D arrays are extremely useful when you’re trying to map the position on your robot on the field. It might be something nice for you to try if you have some time. It definitely makes autonomous programming much easier.
Based on the comments, it looks like you have some really good stuff, but I don’t have RobotC. Would you be willing to post a text version or screen shot?
magiccode, Can you explain in one additional layer of detail?
Are you using a 2d array as a bitmap of the field,
or list by (x,y) of locations of interesting field items,
or something else?
Basically a bitmap of the field. A 2D array of the field, stored in memory, with the position of the goals and/or scoring objects, and the position of the robot in relation to everything else.
I’ve found that a quarter tile works works nicely for each “pixel”, but this is up individual preferences, and how precise the autonomous needs to be. And you have to store both the orientation and the location.
This idea seems really cool to me. I understand the concept of keeping track of where the game objects are on the field and keeping track of your robot on the field but what are you doing with this information as far as your autonomous code goes?
You ought to be able to create some awesome etch-a-sketch type of autonomous programming with that to make custom autonomous modes on the fly, as well as very easily programming regular routines.