Buckle up kiddos, I might learn you something.
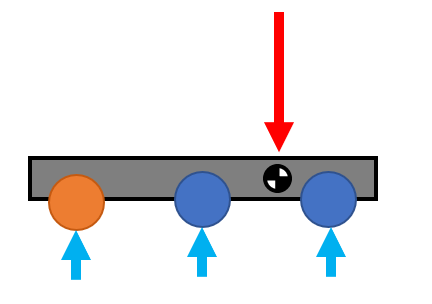
Let’s say the above image is your robot. The fancy looking circle that sort of looks like a checkerboard is to denote the center of mass, or center of gravity (CoG for short). I have also made the front wheel a different color to show that they are unpowered. The rear two wheels that are blue are powered wheels. The red arrow shows the force of gravity on your robot. The light blue arrow are the reaction forces your robot sees when the wheels are on the ground. Remember Newton’s Laws of Motion? Newton’s 3rd Law basically states for every action there is an equal an opposite reaction. Because they reaction forces have to be equal, I have drawn the blue arrows to be approximately 1/3 as long. I apologise if you already knew this, but it will become important in a second.
Right now when your robot moves if has all 4 powered wheels in contact with the floor. All of these contact points will add traction and will make your robot have more torque overall. Heck yes. Pushing power rules!!!
Now let’s look at what happens when the robot goes up the Platform.
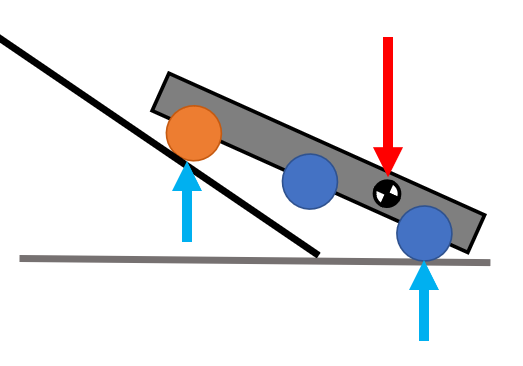
Take a look at those blue arrows that represent those equal and opposite reactions. Gravity pulls down, and the floor/Platform push back up. To keep things simple, I made both the arrows larger and equal. They now have 1/2 of the robots weight a piece. In reality there are more factors that would change the sizes slightly and have the rear wheel arrow larger. But to keep it simple, they can be the same size for this explanation.
Notice that the middle powered wheel has been completely removed from the equation. It doesn’t touch anything! So there’s no way for it to help at this point.
Let’s now rotate the robot so that it’s flat. This always helps me better visualize the forces that are going on. Since I normally stand straight up, up and down make more sense in my brain.
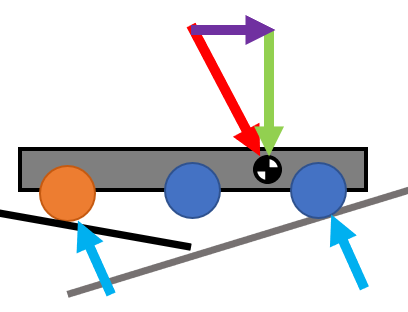
Whoa there Brandon! There’s more arrows now! That’s right. I added those so that we can more clearly understand what is happening while the robot goes up the Platform. The red and blue arrows stayed the same, but I have broken the red arrow into two. The green arrow shows what we understand as gravity pulling the robot down, and the purple arrow shows how gravity is, in a way, pulling the robot backwards,
What if the red arrow was twice as long? Or in other words, what if the robot was twice as heavy as it is now? That purple arrow is going to get much larger. The robot is going to get “pulled” down the platform even more.
Now why did I write this gigantic wall of text? Because I saw it as a learning opportunity I suppose. But mostly because I wanted a full understanding of why sometimes adding MOAR POWER is not always the right answer.
By adding those motors and wheels, the robot’s red arrow got larger, making the purple arrow larger as well. In this last picture I have drawn a black arrow to show that this is where torque is being transferred from the wheels when the robot is climbing.
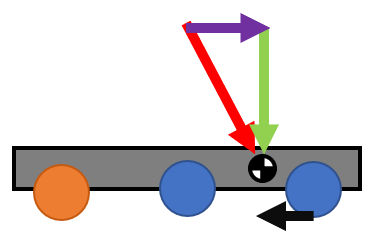
It doesn’t come from orange wheel because it isn’t powered. It only comes from rear blue wheel. It’s pretty easy to see that a much larger black arrow is needed to overcome the purple one.
Hope this made any bit of sense.
Tl;dr: That middle wheel was added to aid in climbing up the Platform. But when the robot needed it most, it vanished.