OK, that is what I assumed, but it is good to know what you are thinking…
In the Cortex Competition Project for Field Control, there are Three Sections:
Initialize
Autonomous
OperatorControl
I don’t know off hand, when the Initialize occurs when connected to a Field Control System, but assuming that happens when the Cortex is Powered Up, you can place a Loop in the Initialize routine that runs until One or the Other Bumper Switch is pressed. If you have an Output or Two available, you can used the Vex LED to Indicated which Autonomous Mode was selected…
It seems sort of pointless as you still have to use EasyC functions to retrieve joystick and set digital IO or motors. Anyway, JoystickToDigitalLatch would be something like this. It would be easier in the easyc runtime library as it has access to other variables that we do not as users.
void
New_JoystickToDigitalLatch( int js, int chan, int but, int digio)
{
    // assume these are initializd to 0
    static  unsigned char   io_status[12];
    static  unsigned char   but_status[32];
            int button_index;
            int cur_button, old_button;

    // calculate index of the current button status
    button_index = ((js-1)*12) + ((chan-5)*4) + (but-1);

    // bounds check the index
    if( (button_index < 0)||(button_index > 31) )
        return;

    //bounds check the digital port
    if((digio < 1) || (digio > 12))
        return;

    // Get current button status
    cur_button = GetJoystickDigital ( js , chan , but );
    // get state from last time
    old_button = but_status button_index ];

    // check for state change
    if( cur_button != old_button )
        {
        // check for press
        if( cur_button == 1 )
            {
            // toggle IO line
            io_status digio-1 ] = 1 - io_status digio-1 ];
            SetDigitalOutput ( digio , io_status digio-1 ] );
            }
        // save new button state
        but_status button_index ] = cur_button;
        }
}
Thanks a ton! That’s exactly what I was looking for. I hadn’t thought of creating a static local array. Do you mind if I use this in my project? I only really need to change the function, argument, and array names. I’ll make sure to give credit where it is due
One question. Why are all the arguments integers and not a smaller variable like signed/unsigned characters?
As far as the two drive function blocks go (Holonomic and Arcade) can you tell me the formula used to find the motor output? That’s where I’m stumped, I’ve written my own holonomic code before by simply taking the sum of the joystick channels (putting negatives where necessary) and then limiting the result between -127 and 127, but I wasn’t sure if this was how EasyC does it. I’m trying to recreate the function block as accurately as possible.
No reason, I just banged the code out in a couple of minutes, change them to match the prototype of the real function if you want, it will work just the same.
I used the EasyC parameter names here (complete with hungarian notation which I dislike ). The code divides the sum and difference on the two joystick channels by 2, this naturally clips but will not allow maximum forward speed. Another version may be.
This does not divide by two but now you need to clip the motor values to ±127, this is the crudest way of doing that.
My own version of arcade does this.
void New_Arcade2(unsigned char ucJoystick,
                unsigned char ucMoveChannel, unsigned char ucRotateChannel,
                unsigned char ucLeftMotor, unsigned char ucRightMotor,
                unsigned char ucLeftInvert, unsigned char ucRightInvert)
{
    long drive_l_motor;
    long drive_r_motor;
    int forward, turn;

    // get joystick values
    forward = GetJoystickAnalog( ucJoystick , ucMoveChannel );
    turn    = GetJoystickAnalog( ucJoystick , ucRotateChannel );

    // Set drive
    drive_l_motor = (forward + turn);
    drive_r_motor = (forward - turn);

    // normalize drive so max is 127 if any drive is over 127
    int max = Abs(drive_l_motor);
    if (Abs(drive_r_motor)  > max)
        max = Abs(drive_r_motor);
    if (max>127) {
        drive_l_motor = 127 * drive_l_motor / max;
        drive_r_motor = 127 * drive_r_motor / max;
    }

    // Invert if necessary
    if( ucLeftInvert )
        drive_l_motor = -drive_l_motor;
    if( ucRightInvert )
        drive_r_motor = -drive_r_motor;

    // set motors
    SetMotor ( ucLeftMotor ,  drive_l_motor );
    SetMotor ( ucRightMotor , drive_r_motor );
}
Here I normalize the values so that if a value is over 127 (absolute) then I scale it back to 127 and adjust the other by the same amount. (note drive values are of type long here due to 16 bit integers not being large enough to do the math).
So I did not test these in EasyC but they compile, probably one of those three algorithms.
For the Holo code it’s basically the same but the algorithm is.
    // normalize drive so max is 127 if any drive is over 127
    int max = Abs(drive_l_front);
    if (Abs(drive_l_back)  > max)
        max = Abs(drive_l_back);
    if (Abs(drive_r_back)  > max)
        max = Abs(drive_r_back);
    if (Abs(drive_r_front) > max)
        max = Abs(drive_r_front);
    if (max>127) {
        drive_l_front = 127 * drive_l_front / max;
        drive_l_back  = 127 * drive_l_back  / max;
        drive_r_back  = 127 * drive_r_back  / max;
        drive_r_front = 127 * drive_r_front / max;
EDIT:
Ok, so I did have a quick look and I think they are using case 3, normalizing values.
Thank you for all of your time and help. I think I have everything I need to finish up the code for my project, then I get to debug it. Fun fun :rolleyes:
Here is some Code, I tried with the Competition Switch Simulator.
I might not have all the Modes Right, but it appears to work when the Cortex is First Programmed or Powered Up. jpearman or Quazar might catch my mistakes… Or someone else…
If you are in the Initialize Function, you can press either Bumper, and a Message will be displayed in the Terminal Window.
When Autonomous Mode is Selected and the Switch goes from Disabled to Enabled, the Autonomous with Display in the Terminal Window, which Mode was Selected, or if Neither was Selected.
A .Zip File with the complete Project is Attached…
#ifndef _main_h_
#define _main_h_

#include "API.h"
#include "UserInclude.h"


#define FALSE   0   //Zero
#define TRUE    !FALSE  //Not Zero

extern unsigned char autonomous_mode ; //Value Zero is No Mode Selected

void Initialize ( void ) ;
void Autonomous ( unsigned long ulTime ) ;
void OperatorControl ( unsigned long ulTime ) ;

#endif // _main_h_
Initialize
#include "Main.h"

void Initialize ( void )
{
      unsigned char no_mode_selected = TRUE; // Default is TRUE, there is No Autonomous Mode Selected
      unsigned char autonomous_mode_input = 0; // Zero is No Mode Selected, yet..

      // Do NOT place infinite loops inside of your Initialize Function.
      // If your Initialize Function never terminates, your program
      // will never progress to Autonomous and Operator Control.
      // See Help for more information about this function.
      // ==========================================================
      //   Add your Initalization Code Here, before the
      //   Check for the Bumper Switched for Autonomous Mode.
      // ==========================================================
      while ( no_mode_selected ) // This Loop will Run FOREVER, or until a Bumper Switch is Pressed, or the Field is ENABLED
      {
            autonomous_mode_input = GetDigitalInput ( 7 ) ; // Check Bumper Switch on Input #7
            if ( autonomous_mode_input == FALSE )
            {
                  PrintToScreen ( "Mode #1 Selected\n" ) ;
                  autonomous_mode = 1 ; // Input #7 is for Autonomous Mode #1
                  no_mode_selected = FALSE ; // Autonomous Mode #1 is selected, so CLEAR the "no_mode_selected" FLAG, to get us out of this Endless Loop
            }
            else
            {
                  autonomous_mode_input = GetDigitalInput ( 8 ) ; // Check Bumper Switch on Input #8
                  if ( autonomous_mode_input == FALSE )
                  {
                        PrintToScreen ( "Mode #2 Selected\n" ) ;
                        autonomous_mode = 2 ; // Input #8 is for Autonomous Mode #2
                        no_mode_selected = FALSE ; // Autonomous Mode #2 is selected, so CLEAR the "no_mode_selected" FLAG, to get us out of this Endless Loop
                  }
                  else
                  {
                        autonomous_mode_input = IsEnabled () ; // Check to see if the Field is ENABLED
                        if ( autonomous_mode_input == TRUE )
                        {
                              autonomous_mode = 0 ; // No Input Selected, and Time has Expired for Initilization, Exiting this Function
                              no_mode_selected = FALSE ; // No Autonomous Mode, Initialization Over, so CLEAR the "no_mode_selected" FLAG, to get us out of this Endless Loop
                        }
                  }
            }
      } // End, while ( no_mode_selected )
}
Autonomous
#include "Main.h"

void Autonomous ( unsigned long ulTime )
{
      if ( autonomous_mode == 0 ) // No Mode was Selected
      {
            PrintToScreen ( "Waiting for OperatorControl, Have a Nice Day.....\n" ) ;
            while ( TRUE )
            {
            }
      }
      else if ( autonomous_mode == 1 ) // Autonomous Mode #1 was Selected
      {
            PrintToScreen ( "Mode #1\n" ) ;
            while ( TRUE )
            {
                  PrintToScreen ( "." ) ;
            }
      }
      else if ( autonomous_mode == 2 ) // Autonomous Mode #2 was Selected
      {
            PrintToScreen ( "Mode #2\n" ) ;
            while ( TRUE )
            {
                  PrintToScreen ( "." ) ;
            }
      }
      else
      {
            PrintToScreen ( "Autonomous STATE ERROR\n" ) ; // We should Never get to this ELSE!!!
            while ( TRUE )
            {
            }
      }
}
Thanks a lot and I was typing on my phone and wanted to say get this code right. I appreciate this a lot and come Monday i will test everything and let you know if its working.
To see what my Code was doing, I needed to know Where in my Code the CPU was Executing…
So the PrintToScreen will send Characters through the Programming Cable to a Terminal, either the one in the IFI Loader program or a standalone one like TeraTerm or RealTerm. I happen to use Both of them.
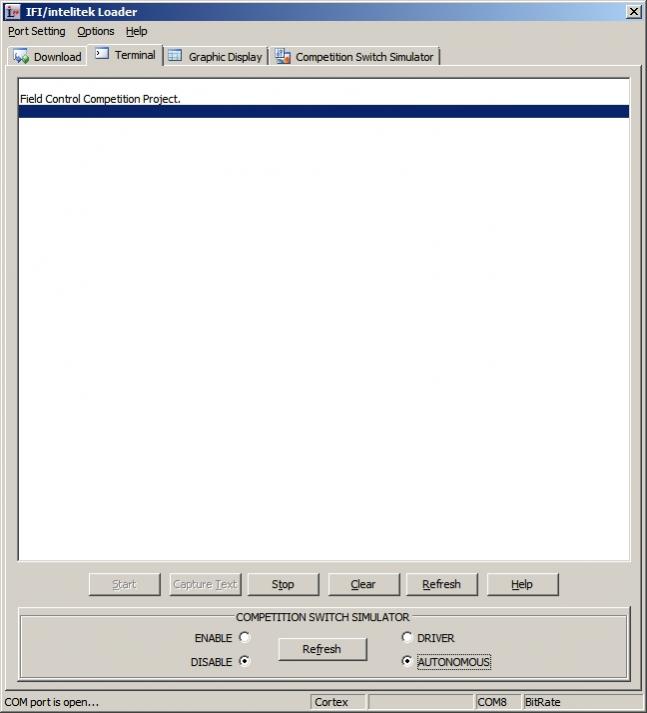
If I Plug the Cortex in to my computer with the USB A-A Cable and start the IFI Loader and select the Terminal Window, then Click Refresh on the COMPETITION SWITCH SIMULATOR, and Set DISABLE and AUTONOMOUS I get a Screen like this:
[ATTACH]7164[/ATTACH]
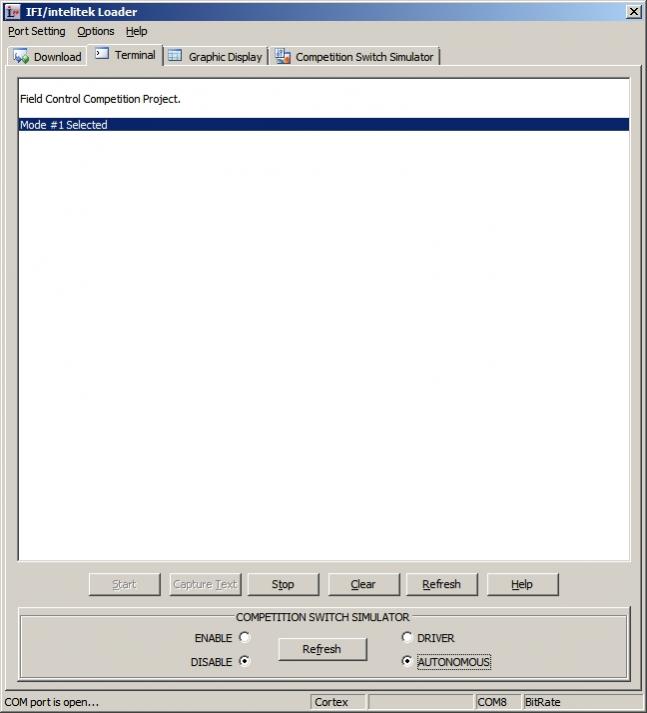
Pressing the Bumper Switch in Input #7, gives this Message in the Terminal Window:
[ATTACH]7165[/ATTACH]
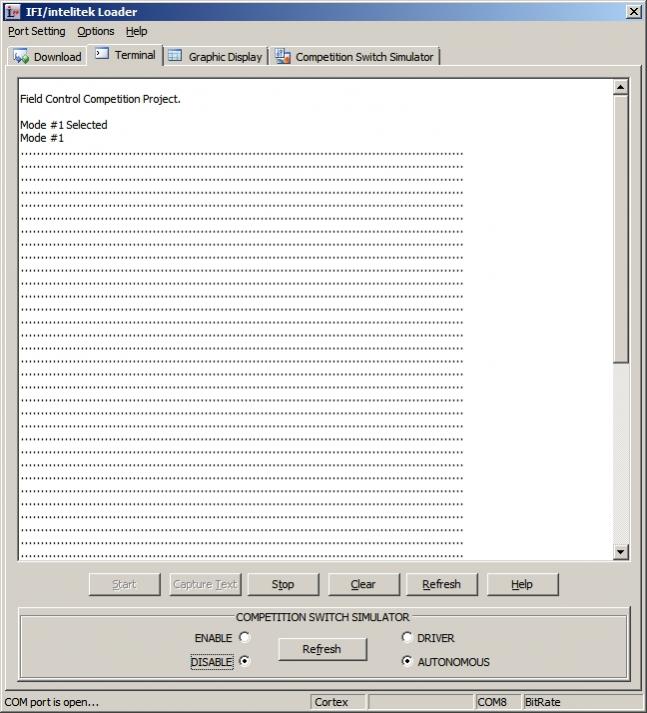
And when the ENABLE is Set, and almost Immediately Set back to DISABLED, you get this:
[ATTACH]7166[/ATTACH]
This is how I knew what my Code Was doing, and Where it was Doing It…
Test, Test and Test with a Real Field Controller… This ALL depends on the Global Variable [FONT=Courier New]autonomous_mode[/FONT] retaining its value between the Initialize Function and the Autonomous Function…
From the Comments in the Initialize Function, it appears that this Function is called on Power-Up, but the Field Controller keeps the Autonomous and OperatorControl functions from being called.
Now some comments about the Code…
Do your Variable Initializations, First, then start the “mostly endless loop” at the very End of the Initialize Function.
This “mostly endless loop” will Terminate when, One of Two Bumper Switches is Pressed, or when the Field Controller is set to Enabled. This Third Test is very critical, because if someone forgets to Press a Bumper Switch or the Bumper Switch fails to make Contact, this “mostly endless loop” will become an “endless loop”, and your Bot will sit there for the duration of the Round… Think of it as a Fail Safe… You might not have any Autonomous Code run, but you can still perform in the OperatorControl section.
If you have an Output or Two available, you can use the VexLED’s and Turn One or the Other ON, when a Bumper Switch is Pressed. If you have the VEX-LCD, it would be a better choice for Input and Display of the Autonomous Mode…
One additional comment about this Initialize Function code… This is a One Shot event. One you Press a Bumper Switch, your Choice is Locked In, unless you Reboot your Bot, and Chose Again…
You could also use this for a Default Autonomous and then have Two optional Autonomous Modes… If you Don’t Press a Bumper Switch, your Autonomous Function will run one Section of Code, if you Press One Bumper Switch or the Other, you will run One of Two different Sections of Code…
According to the Post, Tournament Order of Progression - unofficial answer, the Initialize Function will be run Multiple Times, but this code should Detect the Bumper Switch press at first Power-Up, and Fall Through just before the Autonomous and OperatorControl Functions. Something seems a little strange with the Simulator, so I will do some more experimentation with it…
Interactive Debuggers are very handy too, but EasyC doesn’t have any support for such things, RobotC does have something to use… I have not looked into the RobotC Debugger, yet…
Thanks for all the help I really do appreciate it because I haven’t had anyone to teach me this stuff I’ve had to learn most of it on my own by reading forums and experimenting
If for some reason it doesn’t work you can replace autonomous_mode with GlobalData(1) and it should work fine. Any number between 1 and 20 would work if you’re already using GlobalData(1)…
I AGREE .Hi I am baljinder from team 4549a and we just lost our programmer and our new programmer doesn’t know how to program .So can anyone tell me how so I can explane to hime