I want to start off by thanking you for your great documentation of the issue you are facing. Your videos are very clear and make it much easier to help you.
Now, back to troubleshooting, go back to the point where you had just the right motor reversed but click the download button before running the code. If it doesn’t work the first time or gives errors with the downloading, try downloading it again.
This will fix the issue if what has been happening is the robot not running the latest code, instead running whatever it has downloaded.
Hello, these kinds of problems are usually either one of the easiest fixes or one of the hardest fixes. It appears that in your google docs video, you didn’t download your code. Click the download button next to the green “brain” button to save the code to your robot.
If this doesn’t fix it, looking at your programming, it is possible that you have coded your right motor into the wrong port. Try completely removing the cord from your right motor, and then re-attaching it into the correct port in your code.
If it is still only turning right, try switching cords. I have heard of wires and cords malfunctioning.
If this still doesn’t work, it is possible that your right motor has broke. Test this by removing the “broken” motor and plugging in a new one. If this still doesn’t work, the first “broken” motor wasn’t actually “broken”.
I still cant view the video because google docs in blocked on my computer so could somebody just tell me if the right motor is spinning at all.
Also noticed the user wasn’t downloading between each change.
I would also suggest to flip the bot over and run like that. It will let us see if both motors are being powered in the right or wrong direction or if 1 motor is doing all the work.
I suspect that flipping 1 motor to reverse and downloading the code is going to fix this for the user though.
Hi @imconfused, here is the alternative link of the video. Hope this works https://youtu.be/iK6_agWOBtM
Hi @76782AHighVoltage Thank you very much for the suggestions. I will try it tomorrow morning and let you know the result 
based on the video it appears that you never downloaded the updated code. just to make sure you know how, to download the code you have to connect to the brain & then press the download button to the left of the run button on VEXcode IQ.
Hi all, Thank you for your patience in following up on this issue. I learned so much from this forum.
Finally, the suggestion to download the project before running the block sequence solved my issue—I’m so very happy!
At first, I thought the VEX IQ app and the VEX GO app worked the same way, where in VEX GO, the block sequence can run directly without downloading it first to the brain (at that time, I was using a tablet with a Bluetooth connection).
However, I have a quick question: how to fix the turn right/left that goes beyond 90 degrees, even though the value already set to 90 degrees?
Once again, THANK YOU all for taking the time to think the best solution!
Video documentation.
Congratulations on accomplishing your goal! I wish you good luck in your future vex robotics journey.
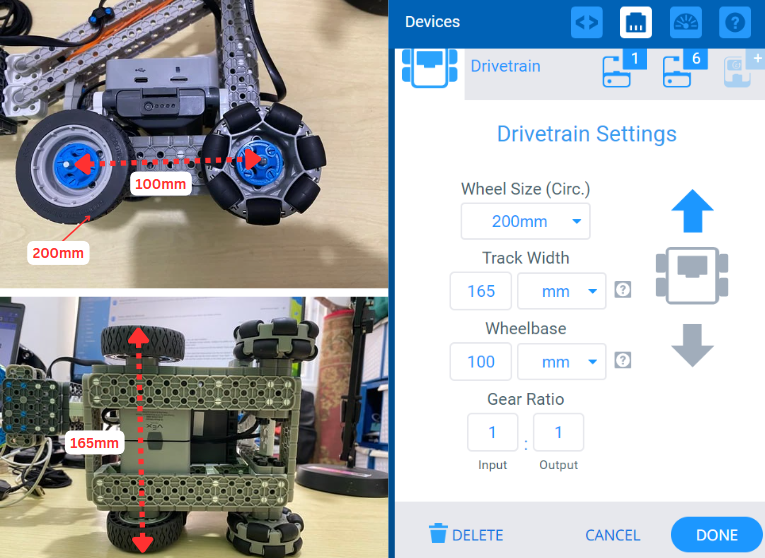
Go to your code, go to devices, click on your drivetrain, it will show you some boxes where you can input numbers.
The first box will require a bit of math, go to Desmos(or the calculator of your choice) take the diameter of your wheels, multiply it by pi(lets say d is diameter put in diameter*pi), input the number you get into the box labeled “Wheel Size (Circ.)”, MAKE SURE TO MEASURE THIS IN MILIMETERS.
Then for the second box, measure the width of your robot from one side to another, input the distance you measured into box labeled “track width” and make sure you select the units you measured in.
Then for the third box measure the distance between the center of the wheels on each side, then input that measurement into the box labeled “Wheelbase”.
Then for the final box, if you have a gear ratio between your motors & the wheels then input the gear ratio into the boxes labeled “Gear Ratio”. In case you don’t know how to write a gear ratio you put the number of teeth on the drive gear(gear closest to the source of rotation) on the left side and the number of teeth on the other gear on the right side.
Hi @imconfused, thank you for the detailed steps. I have adjusted the Drivetrain settings with the appropriate values, but the issue still persists.
Regarding the gear ratio, since I connected the motor directly to the wheels without any intermediate gears, is a 1:1 ratio the correct value?
Thank you.
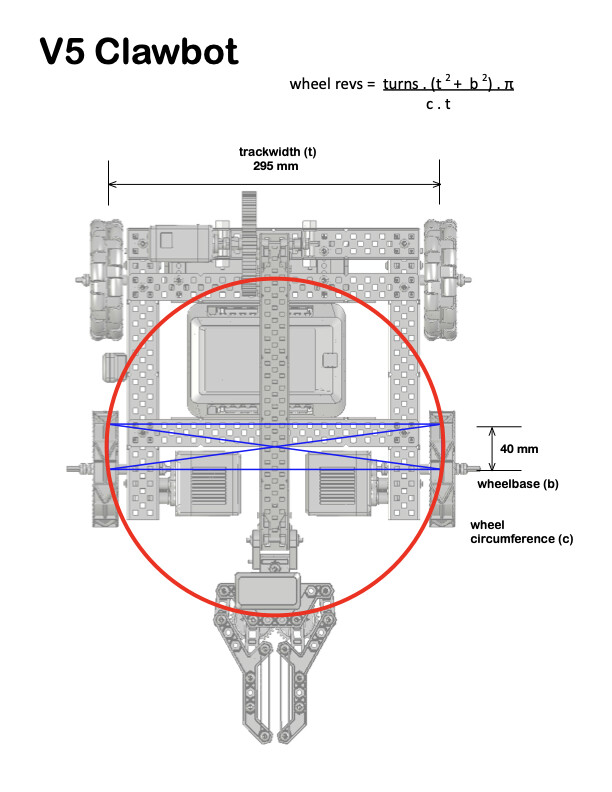
Wheelbase really depends on which wheels are being driven, just two or all four.
for example, this is V5 clawbot that just drives the front two wheels, wheelbase is measured using the center of rotation in this case.
What is the 40mm measurement going to on your diagram?
radius of the wheel which is used to calculate circumfrence.
I didn’t explain the diagram, should have done that.
and this only applies when not using the inertial sensor for turns.
The calculation to determine how to turn the robot a given number of degrees uses three parameters (well, and gearing but I’m ignoring that here)
wheel circumference (c)
trackwidth, the distance between the wheels, (t)
wheelbase (b)
The wheelbase is where the difficulty comes in, it may be the distance between the wheel axles, but for a robot that, for example, only drives the front wheels it will be much less.
Usually it will be twice the distance from the robot’s center of rotation to the driven axle, that’s what the blue box in the diagram of the V5 clawbot I posted is trying to illustrate, wheelbase in this case would be set to 40mm.
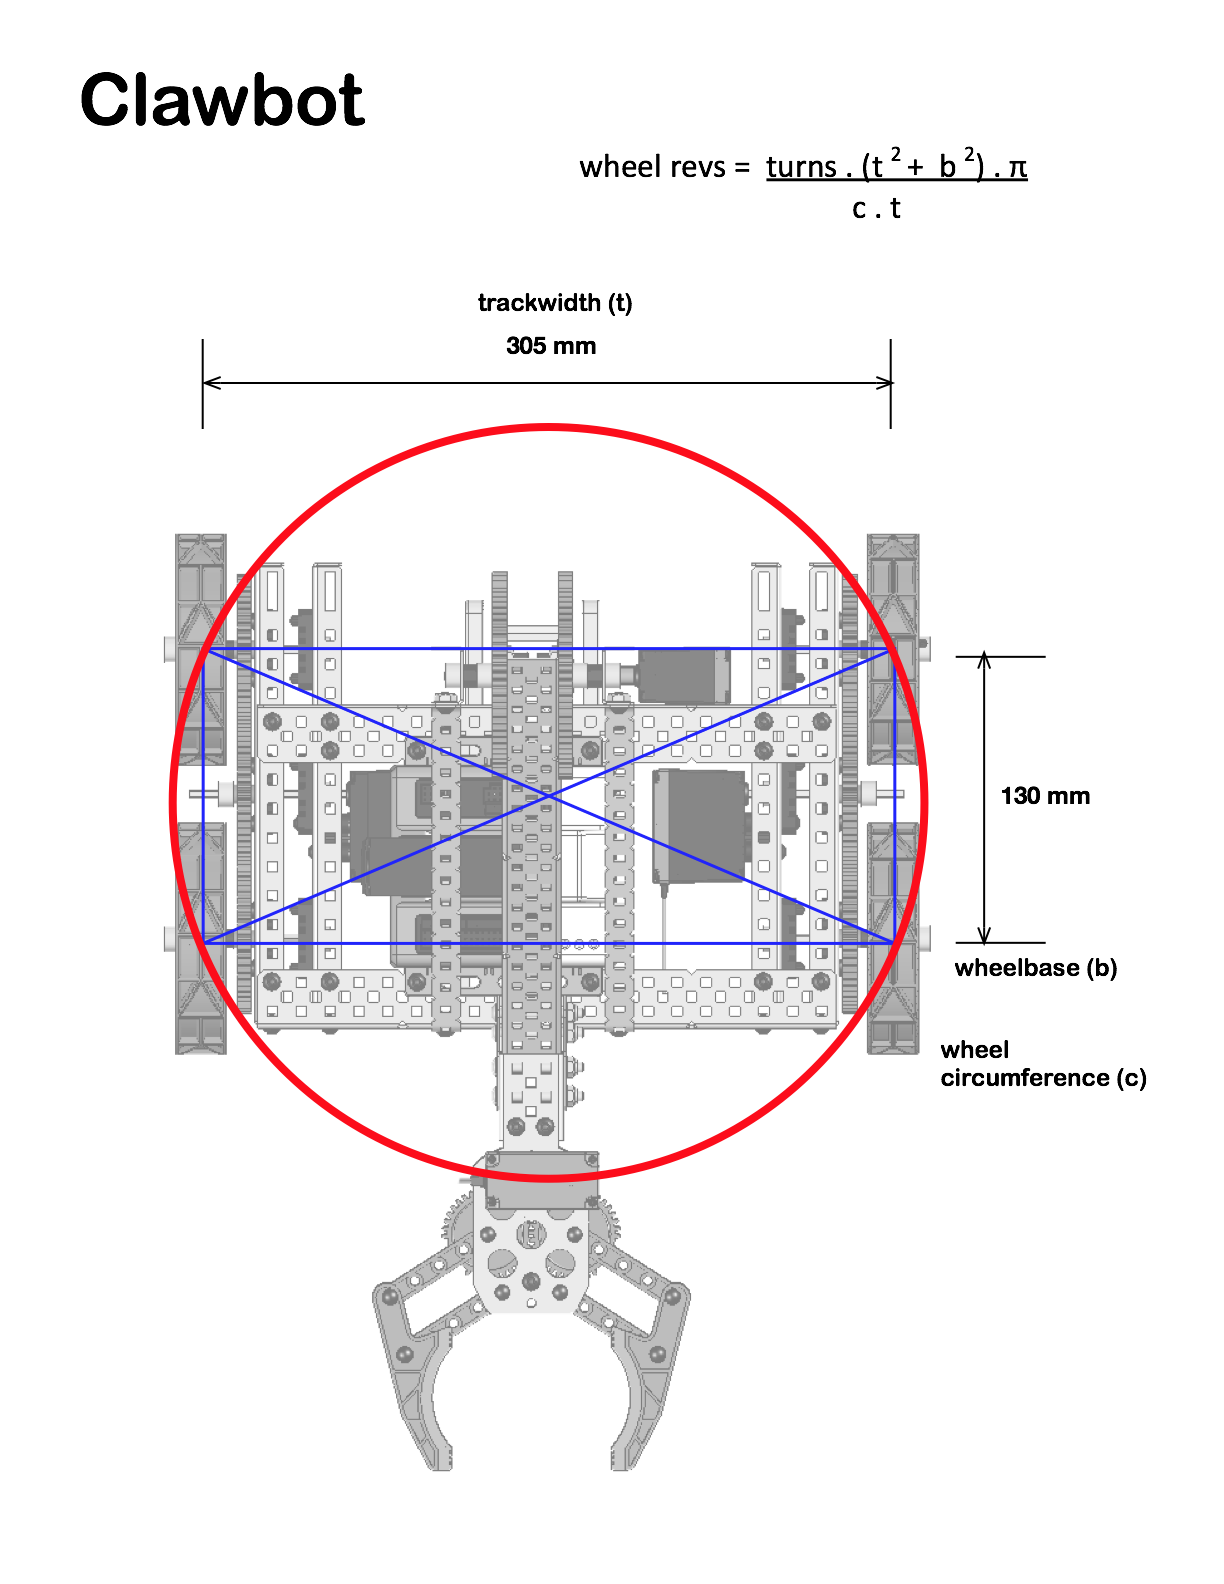
Here is a drawing of the old cortex era clawbot, it was driving all four wheels and the center of rotation was more or less between the axles.
Hi @imconfused and @jpearman thank you for the detailed solution you shared.
This morning, I tried resetting the connected device and recalculating the values for track width and wheelbase, then tested it using a new project file — and finally, the turns were perfectly 90 degrees.
Again, thank you for the insightful solution!
You’re welcome! Always heppy to help make another programers life less stressful!