ConVEX - open source firmware for the cortex

and now for something completely different…
convex_logo.png

… well not really.

ConVEX is now available on github.
https://github.com/jpearman/convex

ConVEX does not have an installer.
ConVEX does not have an IDE.
ConVEX is not easy for beginners to use, in fact, don’t even try, however…

ConVEX is provided as Open Source, that’s right, if you want to brick your cortex, now you can.

Unless you want to struggle with ARM toolchains, eclipse and make tools, I suggest you install PROS first as it does all the heavy lifting for you.

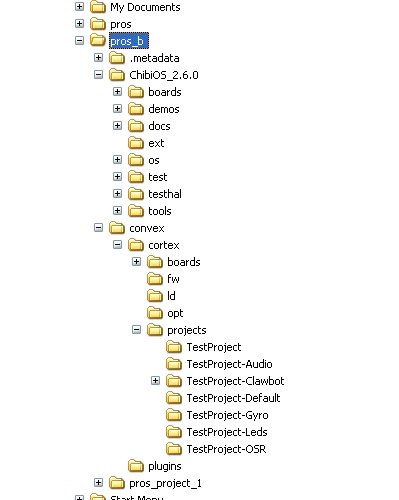
Download the zip file from github, unzip the master and then ChibiOS, move the convex folder and the ChibiOS folder into your PROS workspace, the file hierarchy should look like this.

convex_files.jpg

Then read the documentation.
http://jpearman.github.io/convex/doxygen/html/index.html

Load a demo project and have fun.

So what is ConVEX?

The ConVEX firmware library is an add on package for the ChibiOS/RT operating system that supports the VEX cortex microcontroller. The library adds the necessary functionality to allow C applications to be created and executed on the cortex that can access its available hardware.

ConVEX is not trying to be competitive with ROBOTC or EasyC (or PROS :slight_smile: ), it is only appropriate for advanced users who have some familiarity with RTOS concepts and are comfortable with programming micro-controllers at a bare bones level.

ConVEX uses many features of the ChibiOS/RT library and the hardware abstraction layer that it provides for the STM32 processor. Modification of the low level drivers could cause damage to the cortex hardware, however, under most circumstances user code can be developed that is as robust as the existing environments for the cortex.

Follow the steps outlined in the Getting Started section of the documentation to install ConVEX and the necessary tools. A few demo programs are included that can be used as a starting point for user projects.

Features

  • Preemptive multithreading
  • 128 priority levels
  • Round-robin scheduling for threads at the same priority level
  • Software timers
  • Counting semaphores
  • Mutexes with support for the priority inheritance algorithm
  • Condition variables
  • Synchronous and asynchronous Messages
  • Event flags and handlers
  • Queues
  • Synchronous and asynchronous I/O with timeout capability
  • Thread-safe memory heap and memory pool allocators.

Cortex specific features

  • Digital IO
  • Analog Inputs, potentiometer, accelerometer etc.
  • Ultrasonic sensor support
  • Quadrature encoder support
  • Motor control
  • Integrated motor encoder support
  • Support for two VEX LCD displays
  • Competition control
  • Simple audio tones and chip tone playback support
  • Command line interface (shell)

Optional features

  • SmartMotor library
  • Apollo - real time display of motor and sensor data
  • VEX Gyro
  • PID library
  • ROBOTC style tasks and Sensor support to allow easy code porting

ConVEX projects will take longer to compile than PROS projects, this is partly due to compiling all the source code with each project, but also due to issues with the make program included with PROS (under windows).

ConVEX has been tested using eclipse on OSX (10.5 - 10.8) and also Win XP and Windows 7 64bit. I have not (and do not plan to) test under any version on Linux.

Note: To get the plugin to load under Win7-64bit, after copying to the plugins folder I had to launch PROS in administrator mode. Subsequent launches could be normal.

I’ve been using ConVEX for a couple of months, however, it has not received the level of testing that either EasyC or ROBOTC has. I would use it in parallel to the existing environments until we have proven it over a longer time and squashed the remaining bugs.

Again, this is firmware for advanced users, don’t start randomly playing with code that you do not understand just to see what it does, you may kill your cortex. However, anything is now possible, want to interface that odd I2C sensor, no problem. Want to change the analog sample rate, no problem. A custom PC controller for the cortex, no problem. You get the idea.

Disclaimer.
THIS SOFTWARE IS PROVIDED “AS IS”. NO WARRANTIES, WHETHER EXPRESS,
IMPLIED OR STATUTORY, INCLUDING, BUT NOT LIMITED TO, IMPLIED WARRANTIES
OF MERCHANTABILITY AND FITNESS FOR A PARTICULAR PURPOSE APPLY TO THIS
SOFTWARE. THE AUTHORS SHALL NOT, IN ANY CIRCUMSTANCES, BE LIABLE FOR
SPECIAL, INCIDENTAL, OR CONSEQUENTIAL DAMAGES, FOR ANY REASON WHATSOEVER.

3 Likes

Awesome, Thank You, I am looking forward to working through this and expanding my abilities to work on the Vex Cortex platform.

Cheers Kb

Hello,

I tried installing as per your instructions but the plugin wasn’t showing up in the PROS IDE. I did some googling and tried running with:


/opt/pros/ccide -clean

to refresh the plugins but this did not work either.

I followed the instructions here to enable plugin debugging and I got the following debug messages. While there are some messages related to your plugin, they all also showed up for the purdue one which makes me think they might not be the problem?

I am using Ubuntu 13.04. The plugin installed in regular Eclipse (just the plugin - I didn’t do any of the toolchains or anything because I’d rather have it in PROS if I can)

I’ll keep working on it but if anybody has any ideas on how to get it to work in Linux, please let me know.

**EDIT: **[

So it looks like something’s wrong with org.eclipse.ui, org.eclipse.core.runtime, org.eclipse.core.resources, and org.eclipse.ui.ide which doesn’t make very much sense to me.

](“Jupiter Eclipse Plugin News: Eclipse IDE for C/C++ and Jupiter 3.4.x”)

Let me see if I can run Linux on something, I really didn’t want to get too much into the whole IDE/plugin thing but let me see what I can do.

You do know that it will not show up on the “New” menu by default as a shortcut. It will be in the File->others->Vex_Cortex folder alongside the PROS plugin. You can add it as a shortcut by customizing the perspective.

1 Like

Yes I’m aware. I even checked the installed plugins listing and it wasn’t showing up there whereas it does in the regular Eclipse install.

I am using a 64 bit install if that makes a difference.

I sincerely appreciate you’re looking into the issue and I apologize for the inconvenience.

**Edit: **Even though the Purdue one is experiencing the dependency issues also, it seems like it is already installed in another location (in other words, it was extracted from the jar into the correct locations on another setup) whereas yours hasn’t because of the dependency issues. I think this is why theirs is working.

UPDATE: I uninstalled PROS, deleted /opt/pros manually (since the uninstall left a few directories) and reinstalled.

Now I’m not getting the same errors and I’m getting no errors related to your project but it’s still not showing up: drdanielfc@DrD-Laptop:~$ /opt/pros/ccide -clean -console -consoleLog -debug /opt - Pastebin.com

I suspect that those original problems were perhaps because of a failure for the uninstaller to clean up properly after my failed 32-bit install. Now I have no idea why it’s still not working though.

GOT IT!

I needed to run it as root one time. I had tried doing that earlier but the dependency issues from the 32-bit install messed me up.

So, here’s the installation instructions for Linux:

  • If you already tried installing once
    ** sudo apt-get remove prose
    ** Delete /opt/pros (to open your file browser in admin mode run gksudo nautilus)
  • Install PROS
  • Install ConVEX using JPearman’s instructions
  • Run the IDE once using sudo /opt/pros/ccide
    ** Exit RIGHT AFTERWARD. Do not make any projects.
  • Now run as a regular user

Had the same issue with Windows 7 - 64 Pro, see my first post, plugin would not show unless I ran as admin.

Glad you got it to install, please realize we are all beta testing PROS and ConVEX, it will settle down and become easier. Of course, now I’m in the middle of an Ubuntu 13.04 install :frowning: Luckily for me I have many computers and even more SSD’s to install different OS’s on so will let it finish and try PROS I guess.

1 Like

I did try that originally per your instructions but the failed 32 bit install was messing it up. So I really had two problems.

After verifying that my instructions work, could you add them to your website for future linux users?

I appreciate your help and sorry you ended up installing Ubuntu. Thank you so much for the hard work you’ve put into this! I’m so glad to finally try it out :). I’ll try actually uploading early next week.

Ok, so found the same as you.

Did a clean 64 bit Ubuntu install of 13.04
Installed OpenJDK Java through software center
Downloaded and installed 64 bit PROS, ran it to create a workspace.
Downloaded ConVEX, moved folders into PROS workspace, copied ConVEX plugin to /opt/pros/plugins
(perhaps I should use the dropins folder, need to try that).
ran PROS as admin (sudo /opt/pros/ccide)
life is good, quit and run as standard user.

Edit.
So the better solution will be to distribute the plugin as an archive that is installed using “install new software…”. It still won’t be code signed but should remove the need for running as root. I will probably update the plugin this weekend.

1 Like

After yesterday’s fun and games with plugins and user privileges, I created an update site for the ConVEX plugin, from the readme file.

Three are now three different ways to install the ConVEX plugin.

Best.
Use the install new software feature of eclipse and go to the update site.
http://jpearman.github.io/convex/eclipse/update-site

or
Use the install new software feature of eclipse, use the Add button and
then select the local archive in this folder, eclipse_plugin_archive.zip

or
move the raw plugin to the eclipse (or PROS) plugins folder.
You may then need to restart eclipse with admin privileges before using
as a standard user.

The functionality of the plugin has not changed, however, installing through the eclipse/pros install dialog should remove the need to run as admin. (apparently not, see below)

The plugin does not contain the eclipse firmware, all it does is create a template project that implements tank drive with two motors. Perhaps later it could do much more, create different types of standard project, but I’m not a Java programmer so perhaps I will leave that to others. When the plugin has stabilized I will release the code, it’s based on Stephens :slight_smile:

It would be cool if the PROS team could also make their plugins available via an update site for those who already have a functioning eclipse/ARM toolchain.

EDIT:
Ok, so now there is a problem on Windows 7 and Linux :(, leave the update site alone for now I guess.

EDIT2:
So it’s not just me. The fundamental problem is that, by default, PROS is installed with root (admin in Win7) permissions. This means that you cannot install any new software in the conventional way using “Install new software”, not even standard features from the eclipse download site. I’m testing on OSX with a “normal” eclipse install but my account also has admin privileges so I don’t notice that the PROS directories are owned by root. When I switch to Ubuntu or Windows 7, install fails. Running as administrator on Windows or as root on Linux solves this and allows the ConVEX or any other update site to work. There’s nothing else I can do at this point.

1 Like

I’m going to talk a little about how ConVEX is structured in the next few posts.

As we all know, every C program has to have a “main” function, ConVEX is no different. There is a main.c file with every project that almost always follows the same format. Here is an example.

/*-----------------------------------------------------------------------------*/
/*                                                                             */
/*                        Copyright (c) James Pearman                          */
/*                                   2013                                      */
/*                            All Rights Reserved                              */
/*                                                                             */
/*-----------------------------------------------------------------------------*/
/*    License trimmed for brevity                                                                         */
/*      http://www.apache.org/licenses/LICENSE-2.0                             */
/*-----------------------------------------------------------------------------*/


#include <string.h>

#include "ch.h"
#include "hal.h"
#include "vex.h"

/*-----------------------------------------------------------------------------*/
/* Command line related.                                                       */
/*-----------------------------------------------------------------------------*/

#define SHELL_WA_SIZE   THD_WA_SIZE(256)

// Shell command
static const ShellCommand commands] = {
  {"adc",     vexAdcDebug },
  {"spi",     vexSpiDebug },
  {"motor",   vexMotorDebug},
  {"lcd",     vexLcdDebug},
  {"enc",     vexEncoderDebug},
  {"son",     vexSonarDebug},
  {"ime",     vexIMEDebug},
  {"test",    vexTestDebug},
   {NULL, NULL}
};

// configuration for the shell
static const ShellConfig shell_cfg1 = {
  (vexStream *)SD_CONSOLE,
   commands
};

/*-----------------------------------------------------------------------------*/
//  Application entry point.                                                   */
/*-----------------------------------------------------------------------------*/

int main(void)
{
    Thread *shelltp = NULL;
    short   timeout = 0;

    // System initializations.
    // - HAL initialization, this also initializes the configured device drivers
    //   and performs the board-specific initializations.
    // - Kernel initialization, the main() function becomes a thread and the
    //   RTOS is active.
    halInit();
    chSysInit();

    // Init the serial port associated with the console
    vexConsoleInit();

    // init VEX
    vexCortexInit();

    // wait for good spi comms
    while( vexSpiGetOnlineStatus() == 0 )
        {
        // wait for a while
        chThdSleepMilliseconds(100);
        // dump after 5 seconds
        if(timeout++ == 50)
            break;
        }

    // Shell manager initialization.
    shellInit();

    // spin in loop monitoring the shell
    while (TRUE)
        {
        if (!shelltp)
            shelltp = shellCreate(&shell_cfg1, SHELL_WA_SIZE, NORMALPRIO);
        else
        if (chThdTerminated(shelltp))
            {
            chThdRelease(shelltp);    /* Recovers memory of the previous shell.   */
            shelltp = NULL;           /* Triggers spawning of a new shell.        */
            }

        chThdSleepMilliseconds(50);
        }
}

So starting from the top lets see what we have.

#include <string.h>

#include "ch.h"
#include "hal.h"
#include "vex.h"

/*-----------------------------------------------------------------------------*/
/* Command line related.                                                       */
/*-----------------------------------------------------------------------------*/

#define SHELL_WA_SIZE   THD_WA_SIZE(256)

// Shell command
static const ShellCommand commands] = {
  {"adc",     vexAdcDebug },
  {"spi",     vexSpiDebug },
  {"motor",   vexMotorDebug},
  {"lcd",     vexLcdDebug},
  {"enc",     vexEncoderDebug},
  {"son",     vexSonarDebug},
  {"ime",     vexIMEDebug},
  {"test",    vexTestDebug},
   {NULL, NULL}
};

// configuration for the shell
static const ShellConfig shell_cfg1 = {
  (vexStream *)SD_CONSOLE,
   commands
};

ch.h is the include file for ChibiOS/RT, nearly all source files will include this header. hal.h is the header file for the hardware abstraction layer, again, nearly all source files will include this although usually you will not directly interact with its functions. The hardware abstraction layer provides a way to access the low level functionality of the micro-controller, things like I2C, SPI and digital IO, without having to know details of the exact hardware implementation. Theoretically this makes code portable to other micro-controllers, however, that’s really not much use to us and is really just a way of not having to write all the very low level drivers. vex.h contains prototypes and macros for all the vex cortex related functions.

Next we have some static variables and a definition related to the ConVEX shell. We have an array of ShellCommands that specify the command typed at the console and the function that will be called if that command is entered. These are in addition to built in commands like showing the list of running threads You can add any command you wish here but the function must follow a specific format, for example, lets say we wanted to add a shell command “hello”. We add the following to the ShellCommand structure.

  {"hello",     myHelloFunction},

and a function that could be like this.

void
myHelloFunction(vexStream *chp, int argc, char *argv])
{
    (void)argc;
    (void)argv;

    chprintf( chp, "You typed Hello \r\n" );
}

We could have had some arguments to the hello command, take a look at some of the ConVEX commands to understand how to use them. You will need to create a prototype for myHelloFunction and include that in main.c near the top.

Finally, we have a config structure for the shell, this connects the user commands with a serial channel and is used when the shell is initialized. The shell normally runs on the serial link out through the programming cables to the PC, it could be initialized on either of the other serial ports as well.

Ok, moving on in the main.c file.

	halInit();
	chSysInit();

These lines of code initialize the hardware layer and chibiOS kernel, they will always be the first things you do in the main function.


    // Init the serial port associated with the console
    vexConsoleInit();

    // init VEX
    vexCortexInit();

This initializes the serial port for the console (the shell) and then initializes the cortex. Many other things happen during initialization of the cortex, details in another post.

    // wait for good spi comms
    while( vexSpiGetOnlineStatus() == 0 )
        {
        // wait for a while
        chThdSleepMilliseconds(100);
        // dump after 5 seconds
        if(timeout++ == 50)
            break;
        }

So here we are waiting for communications with the master processor to be finalized, other systems tasks have been started as part of the cortex initialization, this code is mostly here so that when the shell starts up it can send messages knowing the master processor is running. There is a 5 second timeout on this code.

    // Shell manager initialization.
    shellInit();

    // spin in loop monitoring the shell
    while (TRUE)
        {
        if (!shelltp)
            shelltp = shellCreate(&shell_cfg1, SHELL_WA_SIZE, NORMALPRIO);
        else
        if (chThdTerminated(shelltp))
            {
            chThdRelease(shelltp);    /* Recovers memory of the previous shell.   */
            shelltp = NULL;           /* Triggers spawning of a new shell.        */
            }

        chThdSleepMilliseconds(50);
        }

And finally, we initialize the shell, create a thread for it and monitor that thread’s status. Nothing else happens in the main function, it’s all covered by threads started in the vexCortexInit function.

1 Like

Cortex initialization.

The file vexcortex.c contain the initialization function, vexCortexInit.

void
vexCortexInit()
{
    // Init SPI communications
    vexSpiInit();

    // Initialize the motors
    vexMotorInit();

    // Init ADC conversions - No ADC on olimex
#ifndef BOARD_OLIMEX_STM32_P103
    vexAdcInit();
#endif

    // start any test code
    vexTest();

    // Activates the lcd serial driver using custom configuration.
    sdStart(SD_LCD1, &lcd_config);
    vexLcdInit( 0, SD_LCD1 );
    vexLcdPrintf( 0, 0, "ConVEX V%s" , CONVEX_VERSION);
    vexLcdPrintf( 0, 1, "VEX CORTEX LCD1" );

    // Activates the lcd serial driver using custom configuration.
    sdStart(SD_LCD2, &lcd_config);
    vexLcdInit( 1, SD_LCD2 );
    vexLcdPrintf( 1, 0, "ConVEX V%s" , CONVEX_VERSION);
    vexLcdPrintf( 1, 1, "VEX CORTEX LCD2" );

    // Init encoder data structures
    vexEncoderInit();

    // Init I2C bus
    i2cInit();
    // Init IMEs
    vexImeInit( &I2CD1, (vexStream *)SD_CONSOLE );

    // call user setup if it has been defined
    if( vexUserSetup )
        vexUserSetup();

    // start interrupts
    vexExtIrqInit();
    // start any encoders
    vexEncoderStartAll();
    // start any sonars
    vexSonarStartAll();
    vexSonarRun();

    // Start any digital pin interrupts
    vexDigitalIntrRun();

#ifdef    VEX_WATCHDOG_ENABLE
    vexWatchdogInit();
#endif

    // Start the system thread at higher than normal priority
    chThdCreateStatic(waVexCortexSystemTask, sizeof(waVexCortexSystemTask), SYSTEM_THREAD_PRIORITY, vexCortexSystemTask, NULL);
    // Start the monitor thread at higher than normal priority
    chThdCreateStatic(waVexCortexMonitorTask, sizeof(waVexCortexMonitorTask), MONITOR_THREAD_PRIORITY, vexCortexMonitorTask, NULL);
}

This function is mostly self explanatory

Init the SPI communication to the master processor.

Init the motors

Init the analog inputs, the BOARD_OLIMEX_STM32_P103 definition was used when the code was being developed to allow it to run on a cheap eval board from Olimex. It does not have all the functionality of the cortex but is easier to test code on and only $34.

Next, there is a hook for starting development code when testing, not really needed anymore.

By default, ConVEX initializes both serial ports as VEX LCD’s, if you want to use one of the serial ports for other purposes then comment out one or both of the LCD initialization sequences. This needs some cleanup to make it a bit more user friendly, perhaps in the next version.

We init some internal encoder data structures and then the I2C and IMEs.

Next we call the vexUserSetup function if it has been declared. This is where you define the configuration of your digital ports and associate types and encoders with the motors. We need to do this before any of the encoder or sensor interrupts are started which is why it is placed here.

We next start the quad encoders and sonars.

We start the watchdog timer if the user has defined VEX_WATCHDOG_ENABLE, this is disabled by default, uncomment the definition in vex.h if you want to use it.

Finally, two threads are started, the vexCortexSystemTask thread handles SPI communications with the master processor, motor updates for ports 2 through 9 and watchdog timer reloading. It is currently the highest priority thread running, be aware of this if you want to create other high priority threads. All (well most) thread priority settings are defined in vex.h. The second thread started is called vexCortexMonitorTask and handles starting the autonomous and driver control threads that user code is normally placed in.

1 Like

Are you going to go more in depth as to how your watchdog timer works or is it very similar to the RobotC one?

The watchdog timer is part of the STM32 micro-controller, so there is not much to its operation from a software point of view. My default timeout is 1 second, but you can decide to set this however you wish. There are only two functions involved with using the watchdog.

An initialize function, to change the timeout either modify this or make a copy with another name. The clock for the watchdog is 40KHz, this is divided down by a chosen pre-scaler value, in my case I use 64 so the watchdog count clock becomes 625Hz. The reload register then determines when the watchdog would trigger a reset, I set to 625 so a 1 second inteval.

void
vexWatchdogInit()
{
    IWDG_TypeDef   *p = IWDG;
    // enable register access
    p->KR  = IWDG_WriteAccess_Enable;
    // set prescale to /64
    // clock is 40000/64 = 625Hz
    p->PR  = IWDG_Prescaler_64;
    // set reload counter at 1 second (625/625)
    p->RLR = 625;
    // reload
    p->KR  = KR_KEY_Reload;
    // Start independent watchdog timer
    p->KR  = KR_KEY_Enable;
}

The only other thing to do is periodically reload the timeout by calling this function.

inline void
vexWatchdogReload()
{
    IWDG_TypeDef   *p = IWDG;

    // reload watchdog timer
    p->KR = KR_KEY_Reload;
}

Both these functions are in vexcortex.c, to understand the watchdog in any more details refer to the reference manual for the STM32F103, chapter 19, independent watchdog timer

So you either have the option of defining VEX_WATCHDOG_ENABLE and using my built in times, or modifying them, or doing it whatever way you want to by rewriting the code.

1 Like

Does ConVEX have a variable like RobotC’s bResetFromWatchdogTimeout?

Also, is there a way to use the backup registers to write if autonomous has started and, if so, don’t restart autonomous after such a reset?

There is currently no built in variable, however, all you need to do is check the cause of reset from the reset and clock control status register like this (from a ROBOTC demo I wrote before CMU implemented the code, should work in ConVEX but I did not test that).

/*-----------------------------------------------------------------------------*/
/*  Check to see if the IWDG was the cause of reset                            */
/*  returns 1 if IWDG caused reset else returns 0                              */
/*-----------------------------------------------------------------------------*/

int
IWDG_ResetCheck()
{
    RCC_TypeDef   *p = RCC;

    // See if we were reset by IDWT
    if( p->CSR & 0x20000000 )
        return(1);
    else
        return(0);
}

I did not port the backup register code yet, no particular reason, should be easy, did you use this?

1 Like

Oh perfect - thanks! Just curious, what else could cause a reset?

I was planning on trying it out but your post was made one day after our last competition last year so I never actually used it.

We’ve never had a problem with resetting but this year our team is purchasing a ton of IMEs so I’d like to make the code as rock hard as possible.

See this,

https://vexforum.com/showpost.php?p=327524&postcount=91

1 Like