I’m currently working on trying to figure out how to change the dead zone threshold and make it lower in another thread, but in the spirit of confusing myself further, is there a way to change the rates/pids of the clawbot? I’m looking for more of a curve, so that it has better low end control for precise movements ( just for the drive bit obviously). If anyone has any tips on how to change this please let me know! Thanks for the time!!
This thread has a pretty good exponential drive guide. This could probably be very handy.
@trontech569 wow, yeah, thank you!! I’m pretty new to vex as a whole, so for this code, I have to find the stock v5 code and just replace the drive code with this right?
Well, if you have already started programming, you should have a part in your driver code for controlling the motors. For a tank drive, something like (but probably not exactly like):
//For a two motor drive
LeftDriveMotor.spin(forward, Controller1.Axis2.position(), velocityUnits::pct);
RightDriveMotor.spin(forward, Controller1.Axis4.position(), velocityUnits::pct);
//For a four motor drive
FrontLeftDriveMotor.spin(forward, Controller1.Axis2.position(), velocityUnits::pct);
BackLeftDriveMotor.spin(forward, Controller1.Axis2.position(), velocityUnits::pct);
FrontRightDriveMotor.spin(forward, Controller1.Axis4.position(), velocityUnits::pct);
BackRightDriveMotor.spin(forward, Controller1.Axis4.position(), velocityUnits::pct);I’m going to be using the competition template for this code, since it makes it easier and that is what you would use for an actual vex competition.
So, to make this work, you would make a function (C++ Function) that will do the math without the entire thing having to be in the user control function.
Image from post I linked in my last post:
The code in the guide will probably work if you just copy it, as long as you change the motor names to your motor names(using only motors on the left). The code will go above the void usercontrol, NOT INSIDE ANY OTHER { }!
You can then copy this function and change the name to setRightDriveExpo, as well as change the motors to the right drive motors.
In your while loop for driver control, you can either put in the code in the guide (which uses a single joystick to control), or you can simplify it to a tank drive like so (you may want to change the axis number to use a different joystick axis):
setLeftDriveExpo(forward, Controller1.Axis3.position());
setRightDriveExpo(forward, Controller1.Axis2.position());
So, after that messy explanation, your code should work!
If that didn't make sense....
Then here’s some code. You may have to change the axis numbers to correspond with what you want.
/*----------------------------------------------------------------------------*/
/* */
/* Module: main.cpp */
/* Author: VEX */
/* Created: Thu Sep 26 2019 */
/* Description: Competition Template */
/* */
/*----------------------------------------------------------------------------*/
// ---- START VEXCODE CONFIGURED DEVICES ----
// Robot Configuration:
// [Name] [Type] [Port(s)]
// LeftFrontDrive motor 1
// LeftBackDrive motor 2
// RightFrontDrive motor 3
// RightBackDrive motor 4
// Controller1 controller
// ---- END VEXCODE CONFIGURED DEVICES ----
#include "vex.h"
using namespace vex;
// A global instance of competition
competition Competition;
// define your global instances of motors and other devices here
/*---------------------------------------------------------------------------*/
/* Pre-Autonomous Functions */
/* */
/* You may want to perform some actions before the competition starts. */
/* Do them in the following function. You must return from this function */
/* or the autonomous and usercontrol tasks will not be started. This */
/* function is only called once after the V5 has been powered on and */
/* not every time that the robot is disabled. */
/*---------------------------------------------------------------------------*/
void pre_auton(void) {
// Initializing Robot Configuration. DO NOT REMOVE!
vexcodeInit();
// All activities that occur before the competition starts
// Example: clearing encoders, setting servo positions, ...
}
/*---------------------------------------------------------------------------*/
/* */
/* Autonomous Task */
/* */
/* This task is used to control your robot during the autonomous phase of */
/* a VEX Competition. */
/* */
/* You must modify the code to add your own robot specific commands here. */
/*---------------------------------------------------------------------------*/
void autonomous(void) {
// ..........................................................................
// Insert autonomous user code here.
// ..........................................................................
}
/*---------------------------------------------------------------------------*/
/* */
/* User Control Task */
/* */
/* This task is used to control your robot during the user control phase of */
/* a VEX Competition. */
/* */
/* You must modify the code to add your own robot specific commands here. */
/*---------------------------------------------------------------------------*/
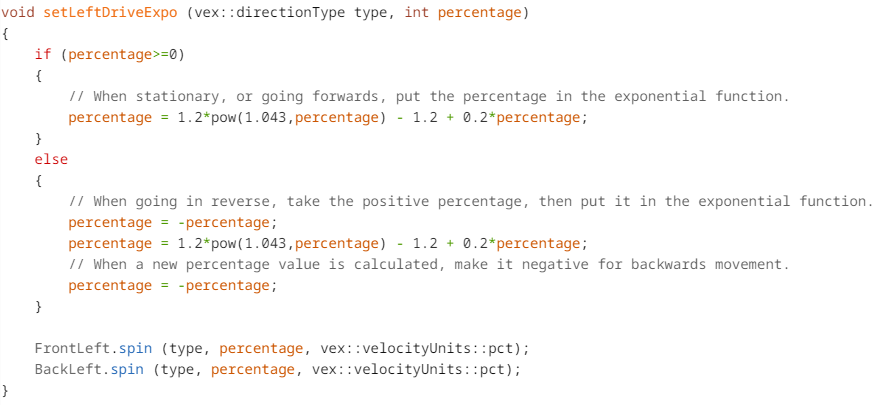
void setLeftDriveExpo(vex::directionType type, int percentage) {
if (percentage >= 0) {
percentage = 1.2 * pow(1.043, percentage) - 1.2 + 0.2 * percentage;
} else {
percentage = -percentage;
percentage = 1.2 * pow(1.043, percentage) - 1.2 + 0.2 * percentage;
percentage = -percentage;
}
LeftFrontDrive.spin(type, percentage, vex::velocityUnits::pct);
LeftBackDrive.spin(type, percentage, vex::velocityUnits::pct);
}
void setRightDriveExpo(vex::directionType type, int percentage) {
if (percentage >= 0) {
percentage = 1.2 * pow(1.043, percentage) - 1.2 + 0.2 * percentage;
} else {
percentage = -percentage;
percentage = 1.2 * pow(1.043, percentage) - 1.2 + 0.2 * percentage;
percentage = -percentage;
}
RightFrontDrive.spin(type, percentage, vex::velocityUnits::pct);
RightBackDrive.spin(type, percentage, vex::velocityUnits::pct);
}
void usercontrol(void) {
// User control code here, inside the loop
while (1) {
// This is the main execution loop for the user control program.
// Each time through the loop your program should update motor + servo
// values based on feedback from the joysticks.
// ........................................................................
// Insert user code here. This is where you use the joystick values to
// update your motors, etc.
// ........................................................................
setLeftDriveExpo(forward, Controller1.Axis3.position());
setRightDriveExpo(forward, Controller1.Axis2.position());
wait(20, msec); // Sleep the task for a short amount of time to
// prevent wasted resources.
}
}
//
// Main will set up the competition functions and callbacks.
//
int main() {
// Set up callbacks for autonomous and driver control periods.
Competition.autonomous(autonomous);
Competition.drivercontrol(usercontrol);
// Run the pre-autonomous function.
pre_auton();
// Prevent main from exiting with an infinite loop.
while (true) {
wait(100, msec);
}
}
@trontech569 ok I’m picking that apart and trying to figure it out, I really appreciate you taking the time to put that together for me, so thank you!! I actually have the claw bot set to the right stick only right now, just because I find it more controllable than tank drive. I only have a small amount of experience with c++, so I’m struggling to interpret this code. I found this (for the older robot)
that makes way more sense than the v5 code, and I was hoping to find something similar to that for this robot, but im realizing that might not happen. My logic was this would be way easier to add expo and set the threshold value lower, because like I mentioned, I’m also trying to figure out how to reduce the remote’s dead zone. (side note: if you have any tips on how to do this for the v5 bot please let me know!!)
The thing I’m not entirely understanding is for this robot, it has a preprogrammed permanent drive code that it just comes with (and obviously within this you can modify it to change the controls/ports easily without vexcode) to add expo and reduce deadzone, I have to make an entirely new code right? And if this is the case, and I have to make an entirely new code, don’t I need the full code for the robot?? (ie the code for arcade drive movement, and also the code for the claw and arm movements, and their corresponding limits and rates). The code I’ve found online everywhere is just drive code, and so I probably could work out just the drive code and get expo into it (I don’t have the deadzone worked out yet like I mentioned earlier) but then what about the arm movement? If you need me to expand on what I mean, please let me know, I realize lack of experience with this makes me sound confusing. thanks for reading my novel lol
@SantinoM, before I answer your other questions, are you programming the clawbot for competition use (playing VRC Change Up against other teams) or are you programming the clawbot for classroom/hobby/fun/whatever else use. My explanation might differ slightly, which is why I’m asking.
@trontech569 I’m so sorry, I had school all day, and this completely left my mind, this isn’t for any sort of competition, Its just me fooling around basically. I fly fpv quads, and so within the realm of drones, you can usually use a program (betaflight, cleanflight etc…) to change the rates and pids. Its quite a bit easier using those imo, just because it involves less programming. The software is set up so that changing the programming of the reciever is more user friendly haha. Those remotes also have the most minute dead zones ever, just because the nature of the hobby is that you want to be in as much control of the drone as possible, that’s why I’m trying to change these things
Ok.
The preprogrammed drive code isn’t editable. You typically wouldn’t use it if you wanted to make your own code. You would have to make an entirely new code if you wanted to customize stuff.
VEX is a company that makes educational materials (among other things). The Clawbot is designed to teach about programming and building concepts. Hence, VEX’s programming is more complicated and harder, since it is not just designed so that you can slightly modify how you drive.
If you are trying to simply drive around the clawbot, using the default drive program is fine. But if you are trying to edit the controls to add deadzones, exponential control, etc. VEX is not structured to support this. You would have to program everything, which would teach you a lot.
If you want to really get into programming, then you would want to research in the Knowledge base and on this forum.
If you just want to modify the code, there isn’t really an easy way to do that without getting into programming.
Yeah, I get that. Not to sound stupid, but just based off a quick look, how similar is the code from that old link to the new v5 code (like would it work- if manipulated- on the new robots?). and, assuming it does, I would just have to add in the expo curve code that you kindly sent me earlier, and reduce the threshold value, right?
Well see, the previous link is C code, and the V5 uses C++ or Python. If you understand the other code, it will be easier to do C++, but there isn’t really a super simple manipulation. The logic behind the code works, but the commands and stuff are different.
thats what I figured. Luckily for me, c++ is pretty much the only code I actually might be able to figure out, just because I’ve taken a quick course on the basics