I have also made a post asking what PID is, I am very curious as to what they are and how they work. I am a first-year coder for my team, using V5’s C++.
Could I have some info and examples? Would help a lot, would help me understand things, and could significantly improve my code (same with the PID post.)
This could prob help you the best because it has docs and stuff, some of the questions you have about PID and Odom can also be found on with BLRS Wiki (the site i have linked)
I do not understand any of this.
What is odometry? What are those numbers and math? What is a tracking wheel? Where is it used? How is it used? Where do I get it? Where do I make it? How do I add it to my code? How do I add it to my robot? Etc.
Also, you only sent the Purdue thing, nothing else, in case you were supposed to.
Also, I am limited to specifically V5 C++. I do not have access to VEX V5 PRO, and I do not use blocks nor Python.
That link is basically a version of the pilons doc. Most people use it as the standard introduction to odometry. That should be all you need.
Odometry is tracking your robot’s position on the field using tracking wheels. Tracking wheels are encoders attached to them that allow you to measure how far they spin. Internal encoders on the motors work too, but they can be inaccurate.
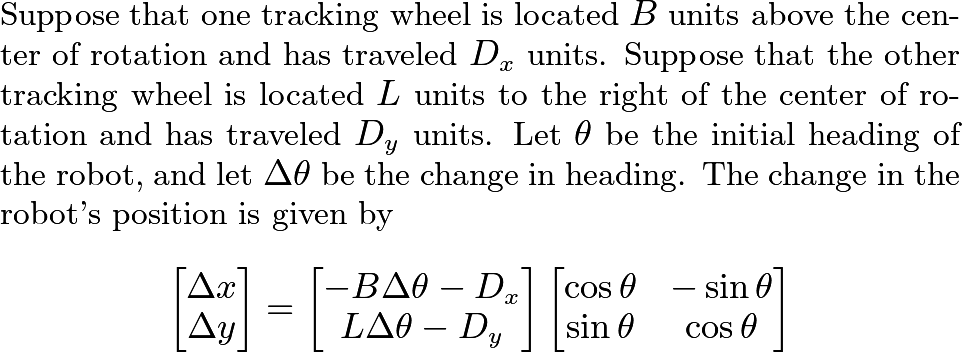
That math lower down is the tracking algorithm (you can ignore the proof, but it is interesting), you will need to translate it to code, there isn’t code to copy and paste in (using V5.) The math isn’t really that complex overall, it just looks very intimidating when you first take a look.
Odometry is a system used to track the position of the robot while it is moving, and is useful for a autonomous routine.
A tracking wheel is a non-powered wheel that is connected to a shaft encoder used to track the movements of the robot.
This picture shows how to mount a tracking wheel to the robot. This one uses a smaller omni wheel that I think is discontinued, but any omni wheel should work
Odometry can help you track the robot’s position. It is useful on especially programming skills I think because it will prevent your robot from constantly adding error, and the time of programming skills is 1 minute, 4 times of autonomous phase.
I still have no idea how this works nor how the tracking wheel helps, I’m not even sure if I have the right sensors. The Purdue Sigbots thing I was given earlier makes absolutely zero sense to me.
How and where do I use odometry, how do I get it, how do I make it, how do I code it?
By the way, I am limited to only and specifically V5 C++, no access to VEX PRO and don’t know how to code python/doesn’t want to use blocks.
It’s my first year, both in VEX and C++ coding. Before this season, I had essentially no C++ experience, but I have been using it all year. I have reliable codes, though, better than pretty much every other first and second-year VEX player at my school.
But I want to learn more, and I want a more reliable coding experience. I hear about PID and Odometry all over this forum, I want to learn what they are, how to make them, and their uses. Can I have some sort of course (dumbed down, preferably)? It would help a ton.
Well for the sensor thing and the “how do I make it,” orange answered that in their response. The sensor is the Optical Shaft Encoder Optical Shaft Encoder (2-pack) - VEX Robotics that a wheel attaches to.
The way 2-wheel odometry works is by using 2 perpendicular tracking wheels. Using the two perpendicular tracking you are able to track the local change in x and y over 5 ms. After that, we can use a conversion vector (some basic trigonometry) to convert our local change into global change using an IMU. This global change is then added to the previous position and we now have a new position.
the best pid introduction I have found is Connor’s tutorial on youtube, and he also explains a lot of other important aspects of code there too. https://www.youtube.com/@TVA1814DeltaIII
Odometry is a way of tracking your robot’s position on the field accurately. It uses “dead wheels” that are on the ground and are not powered by a motor, and shaft encoders to track the distance those wheels move. All of the math is to convert from the movement of the three tracking wheels to a x and y position on the field. It is a more advanced algorithm used in Vex, and it’s probably overkill for a new team, so I wouldn’t do it to gain a competitive edge, but if you’re still interested in learning I recommend the BLRS article linked above for the math, and the youtube video linked above for understanding it. It can definitely be implemented in Vex C++, but it will be a lot of math and I don’t recommend doing it if you don’t have a solid understanding of trig functions.