I think one of the most important things in this game will be managing how fast you move. For example, you will want a very fast lift and a pretty fast drive train, but you don’t want to turn too fast, otherwise the risers might fall out of your claw.
i was thinking maybe tipping over would be more a problem. I think not letting risers fall should be a pretty easy fix.
Some pretty simple ways to remedy tipping would be
- Moving the weight around.
This one is pretty simple. If you’re riser weight is on the front, move the brain and motors to the back. Just remember never add too much weight as a counterweight, because that can slow you down and could even drain your battery.
- Anti-tips
Anti-tips were used on almost all tower takeover tray bots. So if you need a concept for them, you can search for almost any tower takeover reveal video, explanation video, or match video. The basic idea is there are flip-outs on the back of the bot that flip out using rubber bands and friction on the field. This would probably be pretty hard to do for the front side though.
Tl;Dr (too long; didn’t read) move weight around on your robot, or if that doesn’t work, use anti-tips.
I know you weren’t directly asking for help on tipping problems, I just thought I’d share my thoughts.
Wheelie bars work pretty well for me to keep a robot from tipping over. VEX IQ 2020-2021 Rise Above 97300J New Simple Robot Design 70 Points Solo Match - YouTube
May be an interesting idea to see what using a tray type robot could do. Using a design like many of the robots in Tower Takeover used may be an easier way to stack.
I had not seen any videos of a double reverse four bar posted yet, so I thought I would share a video of a test robot we built using a DR4B. As you’ll see in the video, it was wobbly with one riser and when picking up two at a time, it definitely tipped over. We have a fairly big drivetrain base with rear wheel drive motors.
So the dr4b is something that may work for teams, but our current strategy is based more around skills and the need to pick up the two stacked risers at once, so I’m not sure a dr4b is going to work in our scenario.

Our next design we are going to try is a two sided scissor lift, with the rear being pushed forward with a horizontal linear slide.
A DR4B is definitely a viable robot design.
I would recommend MUCH more bracing and more 2x beams instead of 2x beams. I would also recommend a longer drivebase, and making the support for the DR4B taller and further towards the middle. Also, if you used rubber bands on the DR4B with a slower gear ratio, you could really make your lifting power and speed better.
If you are planning on using a DR4B, you should try to lift one riser 3 high instead of 2, one high.
My team and I have made a DR4B robot and we were able to get it to 102 almost 103 in skills. There will be a reveal video for it coming soon…
It looks like your gears aren’t meshed properly which makes one 4 bar get to it’s max height before the other does.
You could try putting motors at the back of your lift, instead of at the base. This could give you some weight on the back so it doesn’t tip over. Definitely add some rubber bands.
@Noah10851B @AD1481 @PenguinHasAGun - Thanks for the feedback, the videos might not have been the best representation of design, as we went through 3-4 design tweak’s and that was just the last one.
@PenguinHasAGun - we rebuilt the dr4b for motors on the back of the lift, but that seemed to struggle more lifting with risers on it (though it did seem better balanced obviously)
Where does everyone recommend putting rubber bands on a db4r design, I think that’s something we are struggling with on this design.
@Noah10851B - looking forward to your reveal, seeing another db4r in action will definitely help fill the gaps we might have in our design and build.
For my DR4B, I got a lot of inspiration from this thread: DR4B Tutorial by 333A. It covers just about everything you need to know about DR4Bs.
The main idea though, is that you want your rubber bands to be extended when your arm is contracted. This is true for anything that needs a bit more power.
@mizdared I should have explained what I meant by rubber bands. The idea with the rubber bands is to have them pull your lift up naturally. You want to arrange your rubber bands in a triangle. When your lift is down, the rubber bands should form a non equilateral triangle. When the lift is fully up, they rubber bands should form a equilateral triangle. Here’s some crappy images i tried to draw.
rubbers bands are red. structure parts are black.
Lift is up: rubbers bands are equilateral
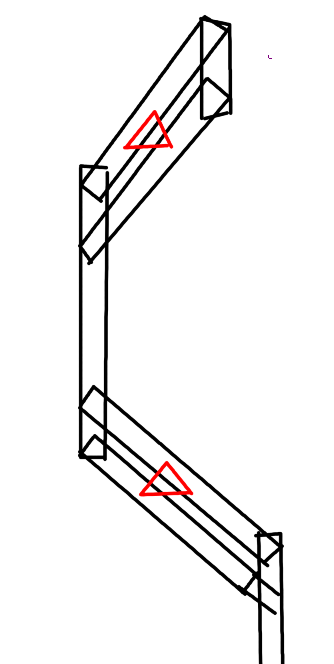
lift is down. rubber bands are not equilateral

the lift isn’t fully down for drawing purposes, but you get the idea.
If you need any more help, you could search the forum for dr4b posts or dr4b rubber bands.
I’m more of a coder so take my tips with a grain of salt.
If I’m not mistaken, I don’t think it matters if it is equilateral when the arm is fully extended. I think the rubber bands need to be much less extended than before.
Ok! I will see if that works during season
Great! Can’t wait to see how it turns out!

yes. except that it’s made of edr parts ![]()
and u might have to do some extra gearing to get it to work on one motor
Huh. I’ve never rubber banded my arm that way. I just put two pins on each side and it works fine.
Rubber bands are literally OP. If you don’t have rubber bands on your DR4B, you are simply doing it wrong. (Mae this isn’t passive aggressive lol I’m just saying fax)
If you plan on going down the Douglas le Reverse Four bar route, I would highly recommend reading through this: DR4B Tutorial by 333A
But I would also recommend not building a DR4B for rise above, as it is much higher than it needs to be.