New Team Guide To VRC
Intro:
When I started out in robotics, there was no good guide on what mistakes I should avoid doing and what things are really useful. This should be a helpful resource to new teams to help them avoid many of the mistakes that new teams make and help give them a better understanding of how vex robotics works. I hope that you find at least some of this information useful in your first season of robotics. This guide was written for the 2020-2021 season “Tipping Point” but a lot of the information should be applicable to future years. Keep in kind that this guide was written from someone in Kansas (not the most competitive region but certainly not easy) some of the information might not be applicable to other regions (for example: in more competitive regions such as North California, getting into state is much more of a challenge)
Feel free to ask any questions in the comments or provide feedback
Starting Out:
Understanding the game:
The very first thing you should do is watch the game reveal video. The 2020-2021 season’s game is Tipping Point. The next thing you should do is read the Game Manual. It can be a bit of a slog to read through, but it is very important. It may seem less daunting when it is broken up into sections.
The first few pages aren’t too important as they are just the update changelog and table of contents. You can skip these for now. Next, it jumps into an overview of the game and definitions (such as what constitutes as scored). These are important, but most of this is covered in the game reveal video or is common sense.
The next section of the manual are the rules. There are 5 types of rules. The first type of rules are safety rules or S rules. These rules just cover general safety and include things such as wearing safety glasses during a match S3. The next rules are general rules or G rules. These rules are mostly common sense and contain rules like don’t destroy other robots G12. The next set of rules are the specific game rules or SG rules. They include rules about what you can’t do in terms of gameplay like don’t descore rings on the other team’s alliance goals SG6. The biggest set of rules are inspection rules or R rules. These state what can’t be done on a robo and include rules such as no more than 8 motors R18. The final set of rules are the tournament rules or T rules. They explain how a tournament is run and include rules like you may appeal the head referee’s decision after a match T2.
Making a team:
Now that you have read through the game manual, there is one more thing you should do before you start preparing to build your robot. You have to get a team. You should have a couple things in mind when forming a team.
First, make sure everyone is one the same level up commitment. If one person on your team wants to win Worlds and another doesn’t care if you make it to state you will have issues. Make sure everyone wants to put in a similar amount of effort or at least understands that other teammates won’t be as active in the robot building process.
Second, make sure you have the right number of people on a team. There is no limit to how many people can be on a vex team so you could be the only person on your team or have 20 other teammates. Personally, I would say that the ideal team size is 3 or 4 people. With 3 people you sometimes won’t have enough people to do things and with 4 sometimes someone doesn’t have a task to do. I would go with more than 5 people, and you could be fine with 2 if you didn’t do an engineering notebook.
The Engineering Notebook:
What is it?:
The engineering notebook is a bound notebook used to document the design process. It is optional and does not have to be done in order to compete, win awards, and have fun. It is a lot of work and as a first year team, it is ok to not do one. However, there are a lot of awards that you can win with it found on Pages 29-38 of the judges guide.
How to Build a Good Notebook:
The judges will judge your notebook based on the rubric on Page 43 of the judges guide. Keep all of these things in mind when doing the notebook. If your team decides to do a notebook, do it well. I know so many teams that have written in the first 5 pages and given up. It would be a commitment if you decide to start.
Always write in pen while doing the notebook. Keep it clean and neat. You may want to look at Tips from other people and look at Other People’s Notebooks. Oftentimes you may want an entire team member dedicated to the notebook.
Building the Robot:
Research:
The first thing you should do is look at what other teams have built for their robots. By typing in “vex tipping point reveal” on youtube you will get lots of results. As a first year team, keep in mind that your team might not have the skills or time needed to build the robots you see as many of these designs will be done by top tier teams. The concepts from the builds will help you figure out what you want to build though.
Another way to gain an idea of what you want to build is to look at the Vex Hero Bots. These are robots with step by step build instructions that can easily be built with no experience. Keep in mind though that these robots only use 4 out of 8 motors so there is lots of room to add other mechanisms or increase the drivetrain to a 4 motor drive instead of 2 motor drive.
Planning:
Before your team starts building, you should decide what your robot is going to be. Plan out what mechanisms your robot will have and where each of your 8 motors is used. Try and avoid making your robot more complicated than it needs to be by adding extra gear trains or sprockets. At the very least, your team should do a sketch of the planned design.
If you are using a concept from another team’s robot or Vex’s hero bots, make sure you understand why the mechanism will help your robot score points. Also make sure you understand how to build the mechanism. Oftentimes it is better to start small.
Building:
Now that your team knows what your robot is going to look like, it is time to start building. The first thing you should do is get familiar with Vex Equipment if you aren’t already. Make sure your robot is stable, and uses good building techniques. When building, test your mechanisms to make sure that they will probably interact with game objects.
The most important part of building is to make sure that you still follow all of the rules. The easiest one to mess up on is . This rule states that at the start of a match, your robot must fit within an 18 inch cube. If you are outside of this limit, you can’t compete, so make sure that your robot fits, even if it means you won’t be able to fit a mechanism you want on your robot.
Finishing Your Robot:
The most valuable resource is time. At a minimum, you need to be done building your robot a week before the first tournament. Generally, you will gain so much more out of coding and practicing driving your robot than you will out of 1 more week of work. The exceptions are if your robot can’t drive, or if you are really close to being able to score.
You probably won’t be able to finish your robot before your first competition starts to get close. This is fine. On your last week of building, make sure that your robot follows all rules and can at least drive. Hopefully you can score, but if you can’t you will still be able to learn a lot.
Driver Control Coding:
Setting Up Your Code:
You have to code in order to compete. Otherwise, your robot would just sit there and do nothing. The first step is to download Vex Code or Vex Code Pro. I use vex code pro, and it is text based while vex code is blocked base.
The next thing you need to do is go to the top left and click “file”. Then click “open examples”. Then as per rule R27 you have to click on “competition template”. This means that your robot can be started and stopped by people running the tournament for matches. Name it and create the file.
The first thing to do is click on this symbol in the top right: ![]() This will allow you to initialize your controller and all of your motors. This is fairly self explanatory, but if you can’t figure it out, there are lots of tutorials online.
This will allow you to initialize your controller and all of your motors. This is fairly self explanatory, but if you can’t figure it out, there are lots of tutorials online.
Coding to Drive:
Everything in green is pseudocode. This means it is just instructions for humans that robots ignore. It is either done by putting // at the start of the line or having the text /* in here */
You will want to scroll down till you find this section:
You will write all or your driving code inside the while loop. There are two main types of drive code, arcade and tank. Here is the basic code for both on a 4 motor drive with explanations. Feel free to make 2 programs and try both.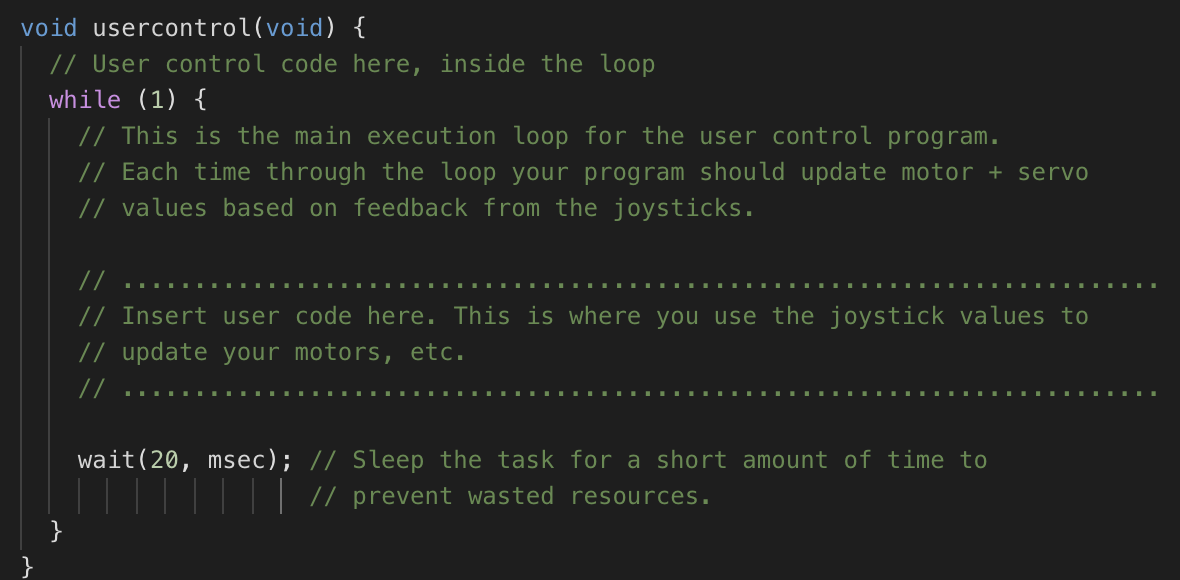
Drive Codes:
Arcade:
leftFront.spin(forward, Controller1.Axis3.position(percent) + Controller1.Axis1.position(percent), percent); // Left Front Drive Code
leftBack.spin(forward, Controller1.Axis3.position(percent) + Controller1.Axis1.position(percent), percent); // Left Back Drive Code
rightFront.spin(forward, Controller1.Axis3.position(percent) - Controller1.Axis1.position(percent), percent); // Right Front Drive Code
rightBack.spin(forward, Controller1.Axis3.position(percent) - Controller1.Axis1.position(percent), percent); // Right Back Drive Code
/MOTORNAME.spin(forward, Controller1.Axis3.position(percent) +/- Controller1.Axis1.position(percent), percent); Example code/
Tank:
leftFront.spin(forward, Controller1.Axis3.position, percent); // Left Front Drive Code
leftBack.spin(forward, Controller1.Axis3.position, percent); // Left Back Drive Code
rightFront.spin(forward, Controller1.Axis2.position, percent); // Right Front Drive Code
rightBack.spin(forward, Controller1.Axis2.position, percent); // Right Back Drive Code
/MOTORNAME.spin(forward, Controller1.Axis2/3.position(percent), percent); Example code/
Extra Motors:
Any motors not on your drivebase should be coded to the bumpers on the top of your controller. Here is a brief example of a lift code:
if (Controller1.ButtonR1.pressing())
{
Lift.spin(forward, 100, percent);
}
else if (Controller1.ButtonR2.pressing()) {
Lift.spin(reverse, 100, percent);
}
else {
Lift.stop();
}
Preparing for Your First Competition:
Finding Roles on the Driveteam:
That the robot is built and coded, you need to figure out who will be driving during the matches. You can decide this however your team wants. You can do a drive off to see who is best, or have whoever is willing to practice the most drive. The most important thing is that whoever is your driver is consistent. You are allowed 3 people in the driver station though. The other 2 teammates should be responsible for telling the driver where to go, keeping an eye on how much time is left, making sure you stay out of your alliance partner’s way, placing match loads, and many other things.
Coding an Autonomous:
Every match begins with a 15 second autonomous period. It is crucial to have an autonomous as there are many benefits. It gives a point bonus to whoever wins, it gives them a headstart on having more objects scored, and it can give win points.
To start coding, find this section:

You will also want to sort your motors into groups with these commands right after “using namespace vex;”. It is very easy to do. Here is an example of the 2 motors on the right side of the drive being combined: “motor_group rightDrive(rightFront,rightBack);” You can refer to the motor group just like you would any motor, but it won’t autofill.
Another couple commands you will want to use are “wait(NUMBER, sec);” “MOTORNAME.setVelocity(NUMBER, percent);” and “MOTORNAME.spinFor(NUMBER, degrees);”
As a general rule for autonomous, don’t move your drive any faster than it needs to. The faster your drive moves, the more likely it is to slip and lose accuracy. Don’t forget to test your auton too! Here is an example of a code that would drive forward, lift something, and drive back:
Drive.setVelocity(25, percent);
Drive.spinFor(200, degrees);
Drive.stop();
Lift.spinFor(100, degrees);
Lift.stop();
Drive.spinFor(-200, degrees);
Practice Driving:
After your auton is done, you will want to practice driving. It can take a couple hours to get used to a robot, so make sure you leave time. There are a couple of ways I like to practice.
The first is by just driving around the field and scoring points. This is the least productive method, but it is really good when you are just starting out. I will score as many points for red then score as many points for blue back and forth.
The second way I practice driving is Skills. Skills is good practice for matches and especially skills. It is generally a good idea for skills to work on a route or path and follow it everytime. Discovering the most effective skills path is a challenge in and of itself.
The third and most productive form of practice is scrimagges. If you have other teams at your organization, you can run matches with and against them. This is the best practice for matches, and it can also engage the teammates who aren’t driving. It can be a good idea to record these matches so you can look back at them later and see and learn from mistakes you made.
Final Prep for a Tournament:
Now that you are comfortable driving and have an auton, it is time to do some final prep. If you aren’t hosting the tournament, you will want to bring some items with you. These include: the robot, 2 controllers, spare brain, spare, radio, spare smart cables, extra screws nuts and stuff, a set of tools, the engineering notebook (if you have one), spare batteries, a laptop with download cable, power cords, battery chargers, and a laptop charger.
This might seem like a lot of stuff, but I have needed everything on that list in the past. Things will break in robotics.
Your First Competition:
Before the Tournament:
Usually, tournaments start at 9:30, but the doors open at 8. You will usually want to show up at 8 and no later than 9. The first thing to do when you show up is get inspected. This is the process where your team will check in, turn your notebook, and the inspectors will make sure you are following all rules.
Next, you will want to get power to your pit area. This will let you charge batteries and your laptop. Once you have power at your table, take your robot to the fields. Usually, the tournament will let you practice on the fields before 9. You will want to run all of your autonomous codes, and make sure they still work. Because it is a different field, the autonomous will probably run differently. You can change it with your laptop though.
Once your codes are working on the new field, you can relax till the drivers meeting. This is usually at 9:15. At the drivers meeting, the Event Partner (person running the tournament) will go through and explain how the day will be run. They will also go over any Q and A Questions retaining to how the game will be played.
Qualification Matches:
After the drivers meeting, qualification match schedules will be handed out. You will be able to see what matches your team is participating in. Ignore the listed times though as events never run on schedule. Usually, each team will have 6 matches.
In qualification matches, teams are partnered with another random team and are up against 2 other random teams. The winners of the match will receive 2 win points and the losers will receive 0. In the event of a tie, both teams receive 1 wp. Teams can also get another win point by completing the autonomous win point task regardless of whether they win or lose.
Teams are ranked based on the average number of wp they have. In the event of a tie, the team with the most autonomous points ranks higher. If they still tie, then the team with the most strength points ranks higher. Strength points are awarded based on how many points the losing alliance in a match earned, but they aren’t really important.
While Qualification Matches Are Happening:
In between qualification matches, there are a number of things you will want to do. First, you will want to talk with your alliance partner for your next qualification match. You can figure out what auton you will be running and what strategy you will use in a match. As a first year team, listen to your alliance partner as they probably know what they are doing.
Another thing you will want to do in between matches is run Skills. Each team will be able to run 3 driver skills matches and 3 programming skills matches. I would highly recommend doing them.
You may also be interviewed by the judges. If you are, answer their questions as best as you can and you may earn a judged award. Even if you don’t have an engineering notebook, you can still win a Judge’s Award. The Judges use a rubric found on page 44 of the Judges Guide.
Watching matches and talking to other teams is also a good idea as that will help you with alliance selection. I would also recommend bringing lunch and eating during your breaks.
Lunch:
Most events give an hour for lunch, but lunch isn’t best used for eating. Over lunch, you will have the opportunity to run skills matches. The fields used for matches will usually be open up for practice matches. This is a great opportunity to figure out your auton if it isn’t working. Lunch is the best time to also figure out who your alliance partner will be.
Alliance selection:
The alliance selection system will form the alliances and tournament bracket for the elimination rounds. Qualification rankings are the only thing used for determining who gets to pick, but many other factors are usually used to determine who is picked.
The alliance selection begins with the team who ranks first in qualifications. They may ask any team to be their alliance partener. If the team who is chosen accepts, the number 1 seed is formed. If the team declines, the team who ranked first in qualifications may pick another team. A team may ask as many teams as they need to in order to get a partner, but teams can only deny another alliance once. If they deny an alliance, they will have to wait until they get a chance to pick.
After the number 1 alliance is chosen, the team who ranked 2nd in qualifications may pick their partner (unless the team who ranked 1st chose the team who ranked 2nd, then the team who ranked 3rd would get to choose). They can pick any team that is not already in an alliance and has not denied any team.
The process continues until all seeds are formed. At local events there are usually only 8 alliances so some teams might not make it into the elimination rounds.
The Elimination Rounds:
The elimination rounds are played in a single elimination bracket. Elimination rounds are best of 1 except for the finals at worlds qualifying events (state). The higher seed alliance plays as red (unless there is an upset). There usually isn’t a lot of time in between these matches, but you should spend it strategizing with your alliance partner. It can also help to watch the match of the alliance you will be up against if you win. This would mean, if you are the 1 alliance, you should watch the 4-5 match, because if you beat the 8 seed then you will play the winner of the 4-5 match.
After the elimination rounds, 2 teams are crowned tournament champions. Other awards are given out at this time too or before the finals. These include excellence, design, judges, and skills champion.
After the Your First Competition:
Reflection and Planning:
Your first practice after the tournament, you need to reflect. What did you learn? How did you do? Do you want to do better at the next tournament? Did you see any ideas on other robots you liked? Is there anything you can do to improve? What were some weak points of your team? These are all good questions to ask and great things to put in the engineering notebook.
Once you know what to change on your robot you should see when your next tournament is. If you only have a week, you aren’t going to want to make many major changes. If you have 2 months, you could build a whole new robot.
Repeat this process after every tournament, and you should keep improving your robot all season long.
Qualifying for State:
As the number of tournaments left draws to a close, you should think about trying to qualify for state. If you have already won an award, you can look up the event you won it at on Robot Events and see if it qualified you for your regional event championship (state). If a team double qualifies at an event (which usually happens), then the extra spots will be given off of the skills list at that event. If it didn’t or you have won any awards, you can still qualify through skills.
You should look up your state event and see how many spots are open for it. Then, you can see what your team is ranked State Wide in skills. If you are ranked higher than the number of spots at state, you should make it in.
The reason behind this is that the top teams in a state will win multiple qualifying awards at multiple events throughout the season. This is called double qualifying. Because the same teams keep winning, state isn’t full. To fill the extra spots, they will go down the state skills list and invite teams off of it until state is full. It is rare for a team who is beneath the skills cut off to win an award for state, but it does happen.
Qualifying for US Open and Worlds:
Teams can qualify for the US Open in Council Bluffs, Iowa by winning an award that qualifies for it and events across the country. It usually fills up in mid February though so just because you are qualified, it does not mean you will be able to attend. It is more competitive than state, but less competitive than Worlds.
The best way to qualify for Worlds is through the state event. As a first year team, it is highly unlikely you will be able to qualify. In order to qualify you will have to win an award that qualifies for Worlds. If a team double qualifies at state (which usually happens), then the extra spots will be given off of the skills list at state.
Conclusion:
I hope you learned a lot from this guide. Feel free to refer back to this guide throughout the season as certain events approach. Vex Robotics Competition (VRC) is a wonderful opportunity. You will learn so many skills, especially in your first year. I would highly recommend doing it all 4 years of high school as each year it is a different game and you will learn new skills every year.
Good luck this season.
@9MotorGang 67101C