Thread demo code
Thread_Demo.iqblocks (4.9 KB)
Completed 2 touch LED code
SelectStartStop.iqblocks (36.9 KB)
Threads in VexOS
VexOS for IQ supports multi-threaded applications. When programing in blocks the simplest way to see this to run the following code which uses events.
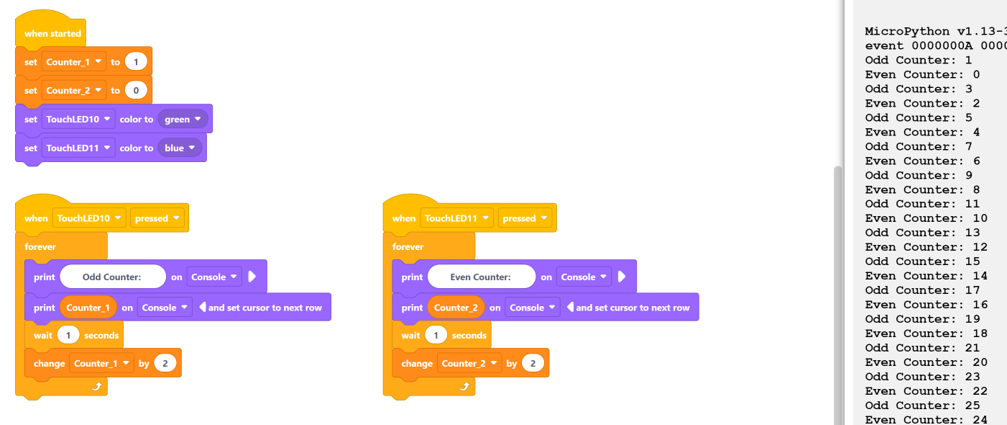
To run this sample, download the “Thread demo code” and run on a brain with two TouchLED attached to ports 10 and 11 as shown below.

Make sure your computer is attached to the a controler which is linked to the brain.
Note that each event call back or (event handler) executes on a sperate thread allowing the two sets of code to execute in parallel.
To code two TouchLEDs to be used as a select/stop and start button on your bot follow the steps listed below.
To get things started we need to setup a few variables.
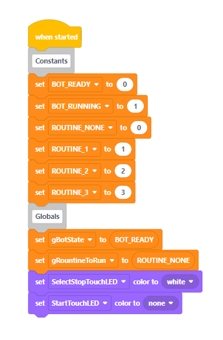
- Constants – (Variables which do not change value during the execution of the code.) Blocks does not support actual constants like many other languages (c++, Python, c# …etc). However, you can in blocks define a variable using a typical constant naming convention such as all caps with a word separation character of underscore (‘_’). For example: BOT_READY, BOT_RUNNING
- Global – (Variables which can be accessed throughout the application code.) Blocks treat all variables as global. However, I would recommend using a naming convention on global variables which start with a lower-case ‘g’ and each word in the variable name was started with a capital letter. For example: gBotState or gRoutineToRun.
- Locals – (Variables only used within the definition of a block.) Once again blocks does not support locals however, you can use naming convention for this as well to help developers keep things clear in their code. I like to use the following convention for locals in Blocks code. Lower case ‘l’ followed by the block name and ending with the variable name. For example: lRountin_1Counter
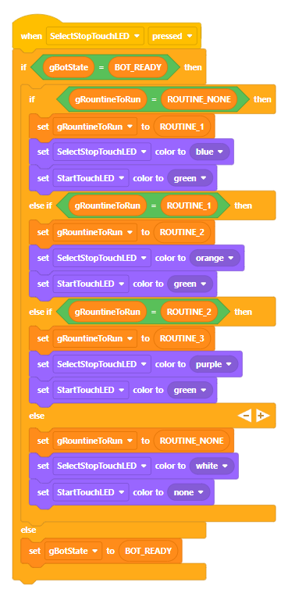
The event handler for the SelectStopTouchLED is listed below:
Code explanation
- The handler starts by checking the bot state. If ready, rotate through the routines to run by checking the current setting and updating it to the next option.
- If bot is running set the bot state back to ready. This is how the stop feature works.
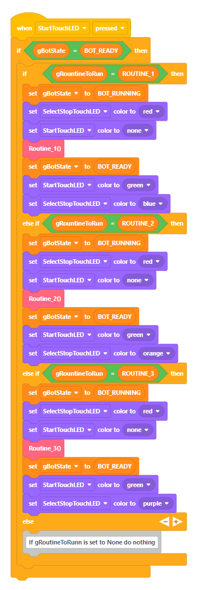
Now we need to add the “StartTouchLED” handler.
Code explanation
- The handler starts by checking the bot state. If ready, execute the routine selected. If not, do nothing.
- To execute a routine, do the following:
a. Set bot state to running.
b. Set SelectStopTouchLED color to red indicating this LED is to be pressed to cancel the routine execution.
c. Call the routine block.
d. Once block execution has been completed set the bot state back to ready.
e. Reset the LED colors.
The last task is to add the routine. One of the routine blocks from the provided code is listed below.
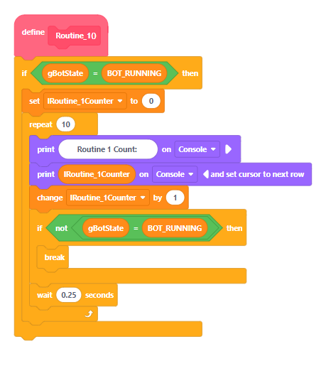
Code explanation
- The block starts by checking the bot state. If running, execute the task. You will want to check bot state before each task in your routine (see second example below).
- Always confirm bot state has not changed – from running – inside of any loops you use in your task.
Second Example
